More Quick
Mask
A D V E R T I S E M E N T
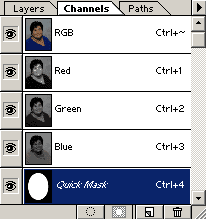
Make your channels palette
visible. By default it will show you a grayscale representation of each of the
three color channels: Red green and blue. Now make a selection and switch to
Quick Mask mode.

You'll see a fourth
channel appear in the channels palette labeled Quick Mask. A Quick Mask
is actually a temporary alpha channel. And an alpha channel is essentially a
selection that has been saved. Any editing that you perform in Quick Mask mode
can also be performed on an alpha channel and vice-versa. The only difference is
that the alpha channel becomes part of your image (when it is saved in a format
that supports them) and the Quick Mask is lost as soon as you exit Quick Mask
mode and deselect.
What else can we do in
Quick Mask mode? Well, you'd be surprised. Basically, any editing function that
can be applied to a grayscale image can also be applied to a Quick Mask or alpha
channel. You can paint on it, apply curves and levels adjustments, even use the
other selection tools within Quick Mask mode. We've already experimented with
applying filters, and you'll find that many of Photoshop's filters can be used
in Quick Mask mode for interesting effects. You can invert a mask using the same
invert command that you use to invert the colors in your image,
Ctrl-I/Command-I.
You may also notice that
when you switch to Quick Mask mode, your foreground and background colors
automatically revert to default black and white (don't worry, your previous
color selection will still be there when you exit Quick Mask mode). This is
because the mask is actually a grayscale representation of a selection. When you
look at the Quick Mask in your channel palette, the black areas represent what
is completely masked and the white areas represent what is unmasked (these will
be the selected areas when you exit Quick Mask mode). Of course, you can also
have partially selected areas and these are represented by shades of gray. When
you paint on a mask, black adds to the mask and white erases the mask. For
further explanation of this, you may wish to read my article.
Let's try a quick exercise
that will really help illustrate this.
- Open any image.
- Type Q for
Quick Mask Mode, then hit Alt-Backspace/Option-Delete
to fill with black.
- Then go to Filters >
Render > Clouds.

- Look at the thumbnail
in the channels palette and you can see it is filled with varying shades of
gray.
- Click the small
eyeball next to the RGB channel at the top of the palette and you'll see the
Quick Mask in grayscale.
Click the space where the
eye was to reveal color image again.
- Toggle out of Quick
Mask mode. The selection marquee is just a bunch of squiggly lines that
don't tell you very much!
- Now hit
Backspace/Delete
to fill with white and your image should have a smoggy hazy appearance. The
areas of the mask that were darkest show the most change and the areas that
were lightest show the least change.
If you find you prefer
working in Quick Mask Mode over using the selection tools, you can duplicate
many of the commands in the Select menu by going into Quick Mask mode and using
other Photoshop filters and commands. Here's Quick Mask equivalents to some of
the Select menu options:
- Expand can be
achieved with Filter > Other > Maximum
- Contract can
be achieved with Filter > Other > Minimum
- Feather can be
achieved with Filter > Blur > Gaussian Blur (try motion blur or radial blur
for other effects.
- Select > Inverse
can be achieved with Image > Adjust > Invert or Ctrl-I/Command-I
- Border can be
achieved with Filter > Sketch > Photocopy. (Experiment with the sliders)
- After applying the
Select > Border command, you can switch to Quick Mask mode and use Image >
Adjust > Levels to give the border a hard edge. In fact, you can use this
anytime you need to convert a feathered selection to a hard edge.
- And of course, you
can make free-form selections by using any of the painting tools in Quick
Mask mode.
Continue on to learn how
to save selections as alpha channels and work with the channels palette.
|
