Alpha
Channels and the Channel Palette
A D V E R T I S E M E N T
Anytime you think you may
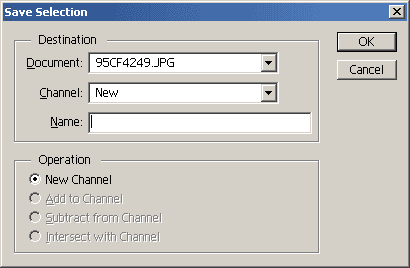
need to reuse a selection, you can save it permanently in an Alpha Channel. To
do this, make a selection, choose Select > Save Selection and a dialog box will
appear.

By default the selection
will be saved with the current document, but you can pull down the menu to make
a new document from the selection. In most cases you will save the selection
with the current document. In the Name field, you'll want to type a name for
your selection so you can identify it when it's time to reload the selection.
The Operator options would
be available if your document already contained an Alpha channel. You can add,
subtract and intersect the selection with an existing alpha channel. Or, as
usual, you can create a new channel.
An image can contain up to
24 channels, including all color channels. These alpha channels are saved even
when you close and reopen an image, but only when the image is
saved in a format the supports it. These include Photoshop's native format (PSD),
PDF (Photoshop 6.0 only), PICT, TIFF, and RAW.
Your saved selections
appear in the channels palette. To load a saved selection, you would choose
Select > Load Selection (but I bet you knew that!). If your document contains
more than one alpha channel you would choose the one you want from the Channel
drop down menu. You can also invert the selection as you load it. If you had an
existing selection already made you can use the Operation options to add,
subtract, or intersect the selection. Otherwise, New will be the only available
operation.
 You
can also work with saved selections via the channels palette. Take a minute to
save a few selections so you can follow along while we discuss the channel
palette. To view a channel as grayscale, just click on it in the channel
palette. To view the selection as an overlay with the composite image still
visible, click the eyeball next to RGB and the eyeball next to the thumbnail of
the channel you want to see as an overlay. You
can also work with saved selections via the channels palette. Take a minute to
save a few selections so you can follow along while we discuss the channel
palette. To view a channel as grayscale, just click on it in the channel
palette. To view the selection as an overlay with the composite image still
visible, click the eyeball next to RGB and the eyeball next to the thumbnail of
the channel you want to see as an overlay.
When a channel is selected
in the channels palette, any editing you perform is applied only to the channel,
just as if you were in Quick Mask mode. Double clicking on the channel brings up
its options and allows you to rename a channel. To the far right of the
thumbnail, you'll see the keyboard shortcuts for selecting specific channels.
It's handy to remember Ctrl-~/Command-~
to select the RGB composite image.
 You'll
also notice a row of buttons along the bottom of the channels palette. These
buttons allow you to load a channel as a selection, save a selection as a
channel, create a new empty channel, and delete a channel. If you want a dialog
box to appear so that you can name the selection when you use the button method
of saving a selection, hold down the Alt/Option
key when you click on the button. To create a new alpha channel based on an
existing channel, drag one of the channels to the create channel button. A
duplicate channel will appear which you can edit. Again, hold down
Alt/Option
for a dialog box. To delete a channel, drag and drop it onto the far right
button with the trash can icon. You'll
also notice a row of buttons along the bottom of the channels palette. These
buttons allow you to load a channel as a selection, save a selection as a
channel, create a new empty channel, and delete a channel. If you want a dialog
box to appear so that you can name the selection when you use the button method
of saving a selection, hold down the Alt/Option
key when you click on the button. To create a new alpha channel based on an
existing channel, drag one of the channels to the create channel button. A
duplicate channel will appear which you can edit. Again, hold down
Alt/Option
for a dialog box. To delete a channel, drag and drop it onto the far right
button with the trash can icon.
|
