Image Size
Dialog Box
A D V E R T I S E M E N T
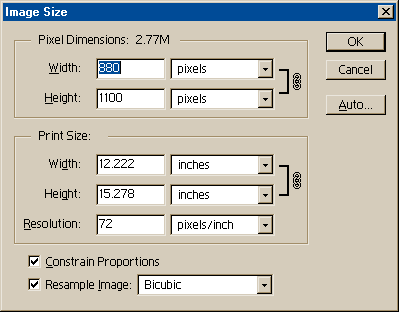
First we have the pixel
dimensions of the image. The drop-down menu allows you to change the dimensions
using percentages instead of pixel values.

The next section is the
Print Size. The default here is inches, but you can change it to cm, points,
picas, or percent. For this course we'll only be dealing with inches. Also under
print size is the resolution setting defined in either pixels/inch (ppi) or
pixels/cm.
| Notes
for Version 6.0 |
| In
version 6, this section is labeled "Document Size" instead of "Print
Size." In my opinion, Print Size was less confusing, but who can say
what the reasoning was behind the change. |
Now notice the link icons
to the right of both the width and height entry fields. This means the height
and width are linked together, so when you change the value of one, the other is
changed proportionally. Try typing a number into any of those fields and observe
how it effects both the height and width. To unlink the height and width, you
can uncheck the constrain proportions check box. You'll rarely want to do this,
though, because it distorts your image.
The Resample checkbox
determines whether or not you preserve the pixel data in the image and it has a
direct effect on the resolution field of the image size dialog. Resampling an
image always involves a change in the pixel dimensions. The general rule is
this:
- When you are changing
the onscreen size of an image you usually want to select the
resample checkbox, modify the pixel dimensions, and set the resolution to
72.
- When you are changing
the print size of an image you will generally want to leave
the resample box unselected, and either adjust the print dimensions or the
resolution to get the results you need.
- As you increase
the print dimensions, your resolution decreases (thus, print quality
decreases).
- As you increase
resolution, the print size must decrease based on the amount of pixel
data available.
If you do not have enough
pixel data to get the print size and resolution you need, then you'll have to
resample the image and Photoshop will create new pixels. This often results
in poorer quality print results, so you need to judge which is the lesser of two
evils: the loss in quality from reduced resolution or the loss in quality from
resampling.
Next to the resample check
box, you'll see the menu where you can choose the
interpolation method Photoshop uses to create new pixels.
- Bicubic is the
default and gives you the best results.
- Bilinear is faster
but not as accurate as Bicubic.
- Nearest Neighbor does
not
anti-alias at all and is very fast, but because it does not blend the
pixels, it results in a jagged appearance.
|
