Raycasting
A D V E R T I S E M E N T
Raycasting
Introduction
Raycasting is a rendering technique to create a 3D perspective in a 2D map. Back
when computers were slower it wasn't possible to run real 3D engines in
realtime, and raycasting was the first solution. Raycasting can go very fast,
because only a calculation has to be done for every vertical line of the screen.
The most well known game that used this technique, is of course Wolfenstein 3D.
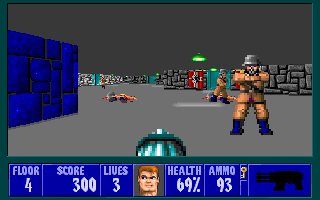
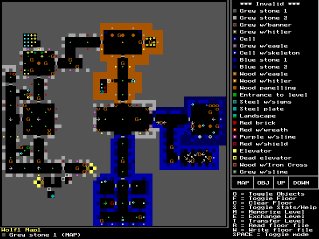
The raycasting engine of Wolfenstein 3D was very limited, allowing it to run on
a even a 286 computer: all the walls have the same height and are orthogonal
squares on a 2D grid, as can be seen in this screenshot from a mapeditor for
Wolf3D:
Things like stairs, jumping or height differences are impossible to make with
this engine. Later games such as Doom and Duke Nukem 3D also used raycasting,
but much more advanced engines that allowed sloped walls, different heights,
textured floors and ceilings, transparent walls, etc... The sprites (enemies,
objects and goodies) are 2D images, but sprites aren't discussed in this
tutorial for now.
Raycasting is not the same as raytracing!
Raycasting is a fast semi-3D technique that works in realtime even on 4MHz
graphical calculators, while raytracing is a realistic rendering technique that
supports reflections and shadows in true 3D scenes, and only recently computers
became fast enough to do it in realtime for reasonably high resolutions and
complex scenes.
The Basic Idea
The basic idea of raycasting is as follows: the map is a 2D square grid, and
each square can either be 0 (= no wall), or a positive value (= a wall with a
certain color or texture).
For every x of the screen (i.e. for every vertical stripe of the screen), send
out a ray that starts at the player location and with a direction that depends
on both the player's looking direction, and the x-coordinate of the screen.
Then, let this ray move forward on the 2D map, until it hits a map square that
is a wall. If it hit a wall, calculate the distance of this hit point to the
player, and use this distance to calculate how high this wall has to be drawn on
the screen: the further away the wall, the smaller it's on screen, and the
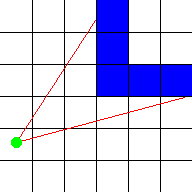
closer, the higher it appears to be. These are all 2D calculations. This image
shows a top down overview of two such rays (red) that start at the player (green
dot) and hit blue walls:
To find the first wall that a ray encounters on it's way, you have to let it
start at the player's position, and then all the time, check whether or not the
ray is inside a wall. If it's inside a wall (hit), then the loop can stop,
calculate the distance, and draw the wall with the correct height. If the ray
position is not in a wall, you have to trace it further: add a certain value to
it's position, in the direction of the direction of this ray, and for this new
position, again check if it's inside a wall or not. Keep doing this until
finally a wall is hit.
A human can immediatly see where the ray hits the wall, but it's impossible to
find which square the ray hits immediatly with a single formula, because a
computer can only check a finite number of positions on the ray. Many raycasters
add a constant value to the ray each step, but then there's a chance that it may
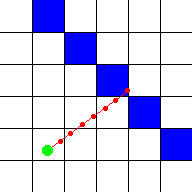
miss a wall! For example, with this red ray, it's position was checked at every
red spot:
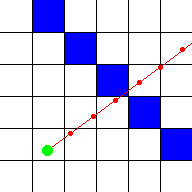
As you can see, the ray goes straight through the blue wall, but the computer
didn't detect this, because he only checked at the positions with the red dots.
The more positions you check, the smaller the chance that the computer won't
detect a wall, but the more calculations are needed. Here the step distance was
halved, so now he detects that the ray went through a wall, though the position
isn't completely correct:
For infinite precision with this method, an infinitely small step size, and thus
an infinite number of calculations would be needed! That's pretty bad, but
luckily, there's a better method that requires only very few calculations and
yet will detect every wall: the idea is to check at every side of a wall the ray
will encounter. We give each square width 1, so each side of a wall is an
integer value and the places in between have a value after the point. Now the
step size isn't constant, it depends on the distance to the next side:
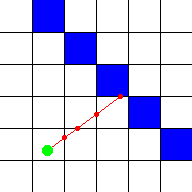
As you can see on the image above, the ray hits the wall exactly where we want
it. In the way presented in this tutorial, an algorithm is used that's based on
DDA or "Digital Differential Analysis". DDA is a fast algorithm typically used
on square grids to find which squares a line hits (for example to draw a line on
a screen, which is a grid of square pixels). So we can also use it to find which
squares of the map our ray hits, and stop the algorithm once a square that is a
wall is hit.
Some raytracers work with Euclidean angles to represent the direction of the
player and the rays, and determinate the Field Of View with another angle. I
found however that it's much easier to work with vectors and a camera instead:
the position of the player is always a vector (an x and a y coordinate), but
now, we make the direction a vector as well: so the direction is now
determinated by two values: the x and y coordinate of the direction. A direction
vector can be seen as follows: if you draw a line in the direction the player
looks, through the position of the player, then every point of the line is the
sum of the position of the player, and a multiple of the direction vector. The
length of a direction vector doesn't really matter, only it's direction.
Multiplying x and y by the same value changes the length but keeps the same
direction.
This method with vectors also requires an extra vector, which is the camera
plane vector. In a true 3D engine, there's also a camera plane, and there this
plane is really a 3D plane so two vectors (u and v) are required to represent
it. Raycasting happens in a 2D map however, so here the camera plane isn't
really a plane, but a line, and is represented with a single vector. The camera
plane should always be perpendicular on the direction vector. The camera plane
represents the surface of the computer screen, while the direction vector is
perpendicular on it and points inside the screen. The position of the player,
which is a single point, is a point in front of the camera plane. A certain ray
of a certain x-coordinate of the screen, is then the ray that starts at this
player position, and goes through that position on the screen or thus the camera
plane.
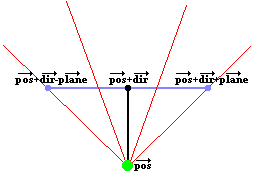
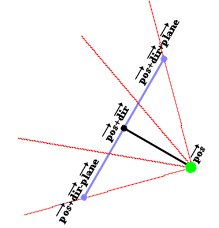
The image above represents such a 2D camera. The green spot is the position
(vector "pos"). The black line, ending in the black spot, represents the
direction vector (vector "dir"), so the position of the black dot is pos+dir.
The blue line represents the full camera plane, the vector from the black dot to
the right blue dot represents the vector "plane", so the position of the right
blue point is pos+dir+plane, and the posistion of the left blue dot is
pos+dir-plane (these are all vector additions).
The red lines in the image are a few rays. The direction of these rays is easily
calculated out of the camera: it's the sum of the direction vector of the
camear, and a part of the plane vector of the camera: for example the third red
ray on the image, goes through the right part of the camera plane at the point
about 1/3th of it's length. So the direction of this ray is dir + plane*1/3.
This ray direction is the vector rayDir, and the X and Y component of this
vector are then used by the DDA algorithm.
The two outer lines, are the left and right border of the screen, and the angle
between those two lines is called the Field Of Vision or FOV. The FOV is
determinated by the ratio of the length of the direction vector, and the length
of the plane. Here are a few examples of different FOV's:
If the direction vector and the camera plane vector have the same length, the
FOV will be 90�:
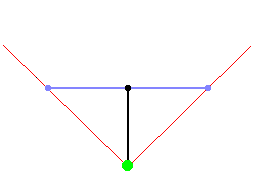
If the direction vector is much longer than the camera plane, the FOV will be
much smaller than 90�, and you'll have a very narrow vision. You'll see
everything more detailed though and there will be less depth, so this is the
same as zooming in:
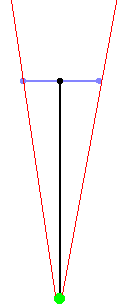
If the direction vector is shorter than the camera plane, the FOV will be larger
than 90� (180� is the maximum, if the direction vector is close to 0), and
you'll have a much wider vision, like zooming out:

When the player rotates, the camera has to rotate, so both the direction vector
and the plane vector have to be rotated. Then, the rays will all automaticly
rotate as well.
To rotate a vector, multiply it with the rotation matrix
[ cos(a) -sin(a) ]
[ sin(a) cos(a) ]
If you don't know about vectors and matrices, try to find a tutorial with
google, an appendix about those is planned for this tutorial later.
There's nothing that forbids you to use a camera plane that isn't perpendicular
to the direction, but the result will look like a "skewed" world.
Untextured Raycaster
To start with the basics, we'll begin with an untextured raycaster. This example
also includes an fps counter (frames per second), and input keys with collision
detection to move and rotate.
The map of the world is a 2D array, where each value represents a square. If the
value is 0, that square represents an empty, walkthroughable square, and if the
value is higher than 0, it represents a wall with a certain color or texture.
The map declared here is very small, only 24 by 24 squares, and is defined
directly in the code. For a real game, like Wolfenstein 3D, you use a bigger map
and load it from a file instead. All the zero's in the grid are empty space, so
basicly you see a very big room, with a wall around it (the values 1), a small
room inside it (the values 2), a few pilars (the values 3), and a corridor with
a room (the values 4). Note that this code isn't inside any function yet, put it
before the main function starts.
#define mapWidth 24
#define mapHeight 24

int worldMap[mapWidth][mapHeight]=
{
  {1,1,1,1,1,1,1,1,1,1,1,1,1,1,1,1,1,1,1,1,1,1,1,1},
  {1,0,0,0,0,0,0,0,0,0,0,0,0,0,0,0,0,0,0,0,0,0,0,1},
  {1,0,0,0,0,0,0,0,0,0,0,0,0,0,0,0,0,0,0,0,0,0,0,1},
  {1,0,0,0,0,0,0,0,0,0,0,0,0,0,0,0,0,0,0,0,0,0,0,1},
  {1,0,0,0,0,0,2,2,2,2,2,0,0,0,0,3,0,3,0,3,0,0,0,1},
  {1,0,0,0,0,0,2,0,0,0,2,0,0,0,0,0,0,0,0,0,0,0,0,1},
  {1,0,0,0,0,0,2,0,0,0,2,0,0,0,0,3,0,0,0,3,0,0,0,1},
  {1,0,0,0,0,0,2,0,0,0,2,0,0,0,0,0,0,0,0,0,0,0,0,1},
  {1,0,0,0,0,0,2,2,0,2,2,0,0,0,0,3,0,3,0,3,0,0,0,1},
  {1,0,0,0,0,0,0,0,0,0,0,0,0,0,0,0,0,0,0,0,0,0,0,1},
  {1,0,0,0,0,0,0,0,0,0,0,0,0,0,0,0,0,0,0,0,0,0,0,1},
  {1,0,0,0,0,0,0,0,0,0,0,0,0,0,0,0,0,0,0,0,0,0,0,1},
  {1,0,0,0,0,0,0,0,0,0,0,0,0,0,0,0,0,0,0,0,0,0,0,1},
  {1,0,0,0,0,0,0,0,0,0,0,0,0,0,0,0,0,0,0,0,0,0,0,1},
  {1,0,0,0,0,0,0,0,0,0,0,0,0,0,0,0,0,0,0,0,0,0,0,1},
  {1,0,0,0,0,0,0,0,0,0,0,0,0,0,0,0,0,0,0,0,0,0,0,1},
  {1,4,4,4,4,4,4,4,4,0,0,0,0,0,0,0,0,0,0,0,0,0,0,1},
  {1,4,0,4,0,0,0,0,4,0,0,0,0,0,0,0,0,0,0,0,0,0,0,1},
  {1,4,0,0,0,0,5,0,4,0,0,0,0,0,0,0,0,0,0,0,0,0,0,1},
  {1,4,0,4,0,0,0,0,4,0,0,0,0,0,0,0,0,0,0,0,0,0,0,1},
  {1,4,0,4,4,4,4,4,4,0,0,0,0,0,0,0,0,0,0,0,0,0,0,1},
  {1,4,0,0,0,0,0,0,0,0,0,0,0,0,0,0,0,0,0,0,0,0,0,1},
  {1,4,4,4,4,4,4,4,4,0,0,0,0,0,0,0,0,0,0,0,0,0,0,1},
  {1,1,1,1,1,1,1,1,1,1,1,1,1,1,1,1,1,1,1,1,1,1,1,1}
}; |
A first few variables are declared: posX and posY represent the position vector
of the player, dirX and dirY represent the direction of the player, and planeX
and planeY the camera plane of the player. Make sure the camera plane is
perpendicular to the direction, but you can change the length of it. The ratio
between the length of the direction and the camera plane determinates the FOV,
here the direction vector is a bit longer than the camera plane, so the FOV will
be smaller than 90� (more precisely, the FOV is 2 * atan(0.66/1.0)=66�, which is
perfect for a first person shooter game). Later on when rotating around with the
input keys, the values of dir and plane will be changed, but they'll always
remain perpendicular and keep the same length.
The variables time and oldTime will be used to store the time of the current and
the previous frame, the time difference between these two can be used to
determinate how much you should move when a certain key is pressed (to move a
constant speed no matter how long the calculation of the frames takes), and for
the FPS counter.
int main(int /*argc*/, char */*argv*/[])
{
  double posX = 22, posY = 12;  //x and y start position
  double dirX = -1, dirY = 0; //initial direction vector
  double planeX = 0, planeY = 0.66; //the 2d raycaster version of camera plane

  double time = 0; //time of current frame
double oldTime = 0; //time of previous frame |
The rest of the main function starts now. First, the screen is created with a
resolution of choice. If you pick a large resolution, like 1280*1024, the effect
will go quite slow, not because the raycating algorithm is slow, but simply
because uploading a whole screen from the CPU to the video card goes so slow.
screen(512, 384, 0, "Raycaster"); |
After setting up the screen, the gameloop starts, this is the loop that draws a
whole frame and reads the input every time.
Here starts the actual raycasting. The raycasting loop is a for loop that goes
through every x, so there isn't a calculation for every pixel of the screen, but
only for every vertical stripe, which isn't much at all! To begin the raycasting
loop, some variables are delcared and calculated:
The ray positoin (rayPos) is initially set to the position of the player (posX,
posY).
cameraX is the x-coordinate on the camera plane that the current x-coordinate of
the screen represents, done this way so that the right side of the screen will
get coordinate 1, the center of the screen gets coordinate 0, and the left side
of the screen gets coordinate -1. Out of this, the direction of the ray can be
calculated as was explained earlier: as the sum of the direction vector, and a
part of the plane vector. This has to be done both for the x and y coordinate of
the vector (since adding two vectors is adding their x-coordinates, and adding
their y-coordinates).
    for(int x = 0; x < w; x++)
    {
      //calculate ray position and direction
      double cameraX = 2 * x / double(w) - 1; //x-coordinate in camera space
      double rayPosX = posX;
      double rayPosY = posY;
      double rayDirX = dirX + planeX * cameraX;
double rayDirY = dirY + planeY * cameraX; |
In the next code piece, more variables are declared and calculated, these have
relevance to the DDA algorithm:
mapX and mapY represent the current square of the map the ray is in. The ray
position itself is a floating point number and contains both info about in which
square of the map we are, and where in
that square we are, but mapX and mapY are only the coordinates of that square.
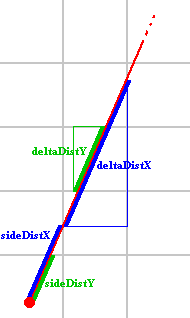
sideDistX and sideDistY are initially the distance the ray has to travel from
it's start position to the first x-side and the first y-side. Later in the code
their meaning will slightly change.
deltaDistX and deltaDistY are the distance the ray has to travel to go from 1
x-side to the next x-side, or from 1 y-side to the next y-side. The following
image shows the initial sideDistX, sideDistY and deltaDistX and deltaDistY:
The variable perpWallDist will be used later to calculate the length of the ray.
The DDA algorithm will always jump exactly one square each loop, either a square
in the x-direction, or a square in the y-direction. If it has to go in the
negative or positive x-direction, and the negative or positive y-direction will
depend on the direction of the ray, and this fact will be stored in stepX and
stepY. Those variables are always either -1 or +1.
Finally, hit is used to determinate whether or not the coming loop may be ended,
and side will contain if an x-side or a y-side of a wall was hit. If an x-side
was hit, side is set to 0, if an y-side was hit, side will be 1. By x-side and
y-side, I mean the lines of the grid that are the borders between two squares.
      //which box of the map we're in
      int mapX = int(rayPosX);
      int mapY = int(rayPosY);

      //length of ray from current position to next x or y-side
      double sideDistX;
      double sideDistY;

       //length of ray from one x or y-side to next x or y-side
      double deltaDistX = sqrt(1 + (rayDirY * rayDirY) / (rayDirX * rayDirX));
      double deltaDistY = sqrt(1 + (rayDirX * rayDirX) / (rayDirY * rayDirY));
      double perpWallDist;

      //what direction to step in x or y-direction (either +1 or -1)
      int stepX;
      int stepY;

      int hit = 0; //was there a wall hit?
int side; //was a NS or a EW wall hit? |
Now, before the actual DDA can start, first stepX, stepY, and the initial
sideDistX and sideDistY still have to be calculated.
If the ray direction has a negative x-component, stepX is -1, if the ray
direciton has a positive x-component it's +1. If the x-component is 0, it
doesn't matter what value stepX has since it'll then be unused.
The same goes for the y-component.
If the ray direction has a negative x-component, sideDistX is the distance from
the ray starting position to the first side to the left, if the ray direciton
has a positive x-component the first side to the right is used instead.
The same goes for the y-component, but now with the first side above or below
the position.
For these values, the integer value mapX is used and the real position
subtracted from it, and 1.0 is added in some of the cases depending if the side
to the left or right, of the top or the bottom is used. Then you get the
perpendicular distance to this side, so multiply it with deltaDistX or
deltaDistY to get the real oblique distance.
      //calculate step and initial sideDist
      if (rayDirX < 0)
      {
        stepX = -1;
        sideDistX = (rayPosX - mapX) * deltaDistX;
      }
      else
      {
        stepX = 1;
        sideDistX = (mapX + 1.0 - rayPosX) * deltaDistX;
      }
      if (rayDirY < 0)
      {
        stepY = -1;
        sideDistY = (rayPosY - mapY) * deltaDistY;
      }
      else
      {
        stepY = 1;
        sideDistY = (mapY + 1.0 - rayPosY) * deltaDistY;
} |
Now the actual DDA starts. It's a loop that increments the ray with 1 square
every time, until a wall is hit. Each time, either it jumps a square in the
x-direction (with stepX) or a square in the y-direction (with stepY), it always
jumps 1 square at once. If the ray's direction would be the x-direction, the
loop will only have to jump a square in the x-direction everytime, because the
ray will never change it's y-direction. If the ray is a bit sloped to the
y-direction, then every so many jumps in the x-direction, the ray will have to
jump one square in the y-direction. If the ray is exactly the y-direction, it
never has to jump in the x-direction, etc...
sideDistX and sideDistY get incremented with deltaDistX with every jump in their
direction, and mapX and mapY get incremented with stepX and stepY respectively.
When the ray has hit a wall, the loop ends, and then we'll know whether an
x-side or y-side of a wall was hit in the variable "side", and what wall was hit
with mapX and mapY. We won't know exactly where the wall was hit however, but
that's not needed in this case because we won't use textured walls for now.
      //perform DDA
      while (hit == 0)
      {
        //jump to next map square, OR in x-direction, OR in y-direction
        if (sideDistX < sideDistY)
        {
          sideDistX += deltaDistX;
          mapX += stepX;
          side = 0;
        }
        else
        {
          sideDistY += deltaDistY;
          mapY += stepY;
          side = 1;
        }
        //Check if ray has hit a wall
        if (worldMap[mapX][mapY] > 0) hit = 1;
} |
After the DDA is done, we have to calculate the distance of the ray to the wall,
so that we can calculate how high the wall has to be drawn after this. We don't
use the oblique distance however, but instead only the distance perpendicular to
the camera plane (projected on the camera direction), to avoid the fisheye
effect. The fisheye effect is an effect you see if you use the real distance,
where all the walls because rounded, and can make you sick if you rotate.
Note that this part of the code isn't "fisheye correction", such a correction
isn't needed for the way of raycasting used here, the fisheye effect is simply
avoided by the way the distance is calculated here. It's even easier to
calculate this perpendicular distance than the real distance, we don't even need
to know the exact location where the wall was hit.
First of all, (1-stepX)/2 is 1 if stepX = -1 and 0 if stepX is +1, this is
needed because we need to add 1 to the length when rayDirX < 0, this is for the
same reason why 1.0 was added to the initial value of sideDistX in one case but
not in the other.
The distance is then calculated as follows: if an x-side is hit,
mapX-rayPosX+(1-stepX)/2) is the number of squares the ray has crossed in X
direction. If the ray is perpendicular on the X side, this is the correct value
already, but because the direction of the ray is different most of the times,
it's real perpendicular distance will be larger, so we divide it through the X
coordinate of the rayDir vector.
Something similar is done in case an y-side is hit. The calculated distance is
never negative, since mapX-rayPosX will be negative only if rayDirX is negative,
and we divide these two through each other.
      //Calculate distance projected on camera direction (oblique distance will give fisheye effect!)
      if (side == 0)
      perpWallDist = fabs((mapX - rayPosX + (1 - stepX) / 2) / rayDirX);
      else
perpWallDist = fabs((mapY - rayPosY + (1 - stepY) / 2) / rayDirY); |
Out of the calculated distance, calculate the height of the line that has to be
drawn on screen: this is the inverse of perpWallDist, and then multiplied by h,
the height in pixels of the screen, to bring it to pixel coordinates. You can of
course also multiply it with another value, for example 2*h, if you want to
walls to be higher or lower. The value of h will make the walls look like cubes
with equal height, width and depth, while large values will create higher boxes
(depending on your monitor).
Then out of this lineHeight (which is thus the height of the vertical line that
should be drawn), the start and end position of where we should really draw are
calculated. The center of the wall should be at the center of the screen, and if
these points lie outside the screen, they're capped to 0 or h-1.
      //Calculate height of line to draw on screen
      int lineHeight = abs(int(h / perpWallDist));

      //calculate lowest and highest pixel to fill in current stripe
      int drawStart = -lineHeight / 2 + h / 2;
      if(drawStart < 0)drawStart = 0;
      int drawEnd = lineHeight / 2 + h / 2;
if(drawEnd >= h)drawEnd = h - 1; |
Finally, depending on what number the wall that was hit has, a color is chosen.
If an y-side was hit, the color is made darker, this gives a nicer effect. And
then the vertical line is drawn with the verLine command. This ends the
raycasting loop, after it has done this for every x at least.
      //choose wall color
      ColorRGB color;
      switch(worldMap[mapX][mapY])
      {
        case 1:  color = RGB_Red;  break; //red
        case 2:  color = RGB_Green;  break; //green
        case 3:  color = RGB_Blue;   break; //blue
        case 4:  color = RGB_White;  break; //white
        default: color = RGB_Yellow; break; //yellow
      }

      //give x and y sides different brightness
      if (side == 1) {color = color / 2;}

      //draw the pixels of the stripe as a vertical line
      verLine(x, drawStart, drawEnd, color);
} |
After the raycasting loop is done, the time of the current and the previous
frame are calculated, the FPS (frames per second) is calculated and printed, and
the screen is redrawn so that everything (all the walls, and the value of the
fps counter) becomes visible. After that the backbuffer is cleared with cls(),
so that when we draw the walls again the next frame, the floor and ceiling will
be black again instead of still containing pixels from the previous frame.
The speed modifiers use frameTime, and a constant value, to determinate the
speed of the moving and rotating of the input keys. Thanks to using the
frameTime, we can make sure that the moving and rotating speed is independent of
the processor speed.
    //timing for input and FPS counter
    oldTime = time;
    time = getTicks();
    double frameTime = (time - oldTime) / 1000.0; //frameTime is the time this frame has taken, in seconds
    print(1.0 / frameTime); //FPS counter
    redraw();
    cls();

    //speed modifiers
    double moveSpeed = frameTime * 5.0; //the constant value is in squares/second
double rotSpeed = frameTime * 3.0; //the constant value is in radians/second |
The last part is the input part, the keys are read.
If the up arrow is pressed, the player will move forward: add dirX to posX, and
dirY to posY. This assumes that dirX and dirY are normalized vectors (their
length is 1), but they were initially set like this, so it's ok. There's also a
simple collision detection built in, namely if the new position will be inside a
wall, you won't move. This collision detection can be improved however, for
example by checking if a circle around the player won't go inside the wall
instead of just a single point.
The same is done if you press the down arrow, but then the direction is
subtracted instead.
To rotate, if the left or right arrow is pressed, both the direction vector and
plane vector are rotated by using the formulas of multiplication with the
rotation matrix (and over the angle rotSpeed).
    readKeys();
    //move forward if no wall in front of you
    if (keyDown(SDLK_UP))
    {
      if(worldMap[int(posX + dirX * moveSpeed)][int(posY)] == false) posX += dirX * moveSpeed;
      if(worldMap[int(posX)][int(posY + dirY * moveSpeed)] == false) posY += dirY * moveSpeed;
    }
    //move backwards if no wall behind you
    if (keyDown(SDLK_DOWN))
    {
      if(worldMap[int(posX - dirX * moveSpeed)][int(posY)] == false) posX -= dirX * moveSpeed;
      if(worldMap[int(posX)][int(posY - dirY * moveSpeed)] == false) posY -= dirY * moveSpeed;
    }
    //rotate to the right
    if (keyDown(SDLK_RIGHT))
    {
      //both camera direction and camera plane must be rotated
      double oldDirX = dirX;
      dirX = dirX * cos(-rotSpeed) - dirY * sin(-rotSpeed);
      dirY = oldDirX * sin(-rotSpeed) + dirY * cos(-rotSpeed);
      double oldPlaneX = planeX;
      planeX = planeX * cos(-rotSpeed) - planeY * sin(-rotSpeed);
      planeY = oldPlaneX * sin(-rotSpeed) + planeY * cos(-rotSpeed);
    }
    //rotate to the left
    if (keyDown(SDLK_LEFT))
    {
      //both camera direction and camera plane must be rotated
      double oldDirX = dirX;
      dirX = dirX * cos(rotSpeed) - dirY * sin(rotSpeed);
      dirY = oldDirX * sin(rotSpeed) + dirY * cos(rotSpeed);
      double oldPlaneX = planeX;
      planeX = planeX * cos(rotSpeed) - planeY * sin(rotSpeed);
      planeY = oldPlaneX * sin(rotSpeed) + planeY * cos(rotSpeed);
    }
  }
} |
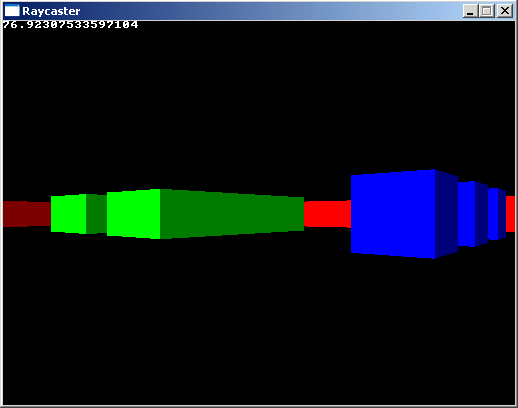
This concludes the code of the untextured raycaster, the result looks like this,
and you can walk around in the map:
Here's an example of what happens if the camera plane isn't perpendicular to the
direction vector, the world appears skewed:

. Reproduced with permission.
|
