This tutorial will describe a program that allows you to paint with various
brushes like in professional painting programs.
Mouse
All major browsers have some support for vector graphics. At this time all major browsers have committed to some level of SVG support except for Internet Explorer. But the implementations are lacking in consistency and completeness:
The Opera web browser (since 8.0) has support for the SVG 1.1 Tiny specification while Opera 9 includes SVG 1.1 Basic support and large parts of SVG 1.1 Full. Since 9.5 alpha 1 Opera has partial SVG Tiny 1.2 support.
Browsers based on the Gecko layout engine version 1.8 (such as Firefox, Netscape, Camino, SeaMonkey and Epiphany), all have incomplete support for the SVG 1.1 Full specification. The Mozilla site has an overview of the modules which are supported in Firefox 1.5[14] and an overview of the modules which are in progress in the development version of Firefox.[15] Gecko 1.9 will be included in the upcoming Firefox 3.0 and will add support for more of the SVG specification (including some filters).[16]
KDE's Konqueror has a SVG plugin called KSVG. KSVG2 is slated to be rolled into KDE 4 core which could make it native rendering for Konqueror some time in the future. KDE 4 will also feature system-wide support and use of SVG for graphics. Elsewhere in KDE the format is finding greater use, and from version 3.4 onwards SVG wallpapers are supported.
Apple's Safari browser ported KSVG2 into WebCore, initiating work on incorporating native support of SVG into Safari.[17] The version of Safari included with Mac OS X v10.5 and Mac OS X v10.4.11 includes SVG support; which is not perfect, but has seen rapid improvement. In fact, the latest WebKit builds are far along in terms of implementing everything in SVG 1.1 Full.
Internet Explorer has support for VML, instead of SVG.
The same browsers that support SVG also support the HTML5
The small screen size is only chosen to have a small enough screenshot here.
This program has a problem though! If you move the mouse faster than the speed
of the program can handle, not all pixels are overdrawn and you get dot patterns
instead:
To overcome this problem, painting programs don't draw a pixel at the current
mouse position, but the draw a line between the current and the previous
position. That way it looks as if all pixels the mouse pointer encountered are
overdrawn, and the lines are short enough to look curvy. The extension of the
program is very easy, oldMouseX and oldMouseY represent the mouse position of
the previous frame, and instead of pset, drawLine is used:
Now you can draw as fast as you want, the curves are now fully connected instead
of just some dots:
Color
It's always nicer to be able to draw in color, so we can extend the painting
program with a color picker. The color picker will use the HSVtoRGB function,
see the Color tutorial for more details. This function allows you to display the
colors in the Hue Saturation Value format, which is easier to use when choosing
a color.
The program works basically the same as the previous one, but an extra function
is added to draw the color picker, there are colors defined, and there's a test
to see if the mouse is on top of the color picker, if so clicking the mouse
buttons selects a color rather than painting.
The main function starts again with setting up the screen, clearing it to white,
and defining the variables. Now, 2 colors are defined: the Foreground Color
(fore), and the Background Color (back). The foreground color is used for the
left mouse button, and the background color for the right mouse button, and when
clearing the screen by pressing both buttons.
There's also a brightness defined, this value is used for the color picker
itself and doesn't affect the foreground and background color values.
void drawToolbar();Uint8 brightness = 255; //for the color picker
int main(int argc, char *argv[])
{
screen(256, 256, 0, "Painting");
cls(RGB_White);
int mouseX, mouseY;
int oldMouseX, oldMouseY;
bool LMB, RMB;
ColorRGB fore = RGB_Black; //foreground colorColorRGB back = RGB_White; //background color
Then the main loop starts, first it sets the mouse position values of the
current and previous frame (for the lines). Then it tests if the mouse Y
position is larger than 64: if it's larger, the mouse is in the drawing area, if
it's smaller, the mouse is in the toolbar area (the top 64 lines of the window).
If in the drawing area, the same is done as before but now with the colors
instead of just black and white.
If in the toolbar area, the mouse checks in what part of the toolbar area the
mouse is: if mouseX is smaller than 128, the mouse is in the color picker, and a
color value is given to the foreground or background color with the HSVtoRGB
function.
If mouseX is between 128 and 144, the mouse is on the color picker brightness
area, which changes the brightness of the color picker.
Finally, a gray background for the toolbar area is drawn, and the drawToolbar
function is called.
The drawColorPicker function simply draws a Hue Saturation pattern with the
current brightness, and draws the brightness selector.
void drawToolbar()
{
    ColorRGB color;
    for(int x = 0; x <128; x++)
    for(int y = 0; y < 64; y++)
    {
        color = HSVtoRGB(ColorHSV(x * 2, y * 4, brightness));
        pset(x, y, color);
    }
    for(int x = 128; x < 144; x++)
    for(int y = 0; y < 64; y++)
    {
        pset(x, y, ColorRGB(y * 4, y * 4, y * 4));
    }
}
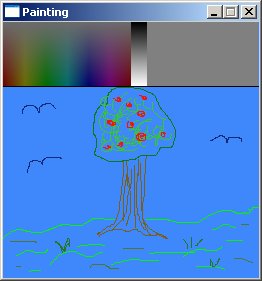
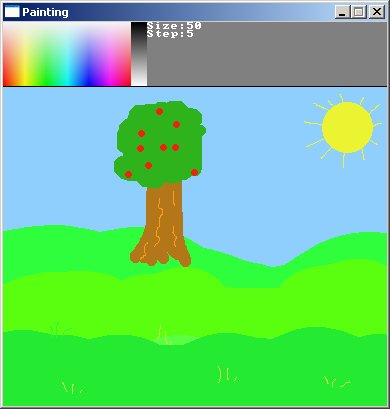
Here's what the program looks like and what you can do with it:
To use the program: select a color for the left or right mouse button by
clicking on the Hue Saturation area in the top left with the corresponding
button. Change the brightness of the Hue Saturation area by clicking on the
greyscale area (the black to white gradient). This doesn't change the color of
your mouse buttons, only the color of the color picker, so you can now select a
darker or brighter color.
Click on the area below the toolbar with left or right mouse button to draw with
the corresponding color, or press both buttons to clear the color of the whole
screen to the right mouse button color (background color).
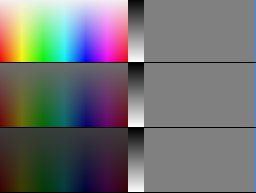
This image shows a few different brightness values of the color picker:
Size
It's quite hard to draw with a brush with a size of only 1 pixel all the time,
especially if you need to color big areas. So it'd be handy to be able to change
the size of the brush. If the brush size is larger than 1, it can have a certain
shape, in this case a filled circle.
With larger brush sizes we can't use the "line" function to connect two points
anymore, because this function draws a line with thickness one. Instead, we'll
use a totally different method, which tries to be very similar to the way Paint
Shop Pro works. In this method, the shape of the brush is redrawn only after so
many pixels, if this amount of pixels is small enough the shape of the brush
will overlap itself often enough to look like a single stroke, if the amount is
larger, you'll see more clearly how the shape is repeated. In Paint Shop Pro you
can control this amount of pixels with "Step", step = 100 means the brush is
repeated only once for it's own size, while if you make it smaller it's repeated
more often. For example the following is 3 times a horizontal line drawn in
Paint Shop Pro with a step of 100, 50 and 10 respectively, with a brush size of
25:
When the brush size is 1, it's better to stick with the line drawing, that gives
better looking results than drawing filled circles with diameter 1. The code is
a bit long because it tries to be as accurate as possible and there are some
fishy things with the "step".
The code begins with initializing the functions and variables. The function
drawToolbar will draw both the color picker, and settings of size and step. The
function drawBrush replaces the simple drawLine of the previous version, it'll
draw filled circles between the old and current position with the step distance
between each filled circle. The function distance2D is included because now and
then a 2D distance needs to be calculated.
The variable brightness is for the color picker, size and step are the new
parameters for the brush.
Inside the main function, it initializes the mouse positions and color, and the
boolean "initiate", which is true only if you just started pressing the mouse
button. It's used to make sure that when you just click the button, the brush
will be drawn there for sure, no matter what the distance to the previous
position is.
void drawToolbar();
void drawBrush(int & x1, int & y1, int x2, int y2, ColorRGB color);
double distance2D(int x1, int y1, int x2, int y2);
bool inBetween(int x1, int y1, int x2, int y2, int x3, int y3);

Uint8 brightness = 255; //for the color picker
int size = 10, step = 5; //brush size and step
bool initiate; //when you just start pressing mouse button

int main(int argc, char *argv[])
{
    screen(384, 384, 0, "Painting");
    cls(RGB_White);
    int mouseX, mouseY;
    int oldMouseX, oldMouseY;
    bool LMB, RMB;
    ColorRGB fore = RGB_Black; //foreground color
    ColorRGB back = RGB_White; //background color
Then the main loop starts, first it gets the current mouse state. If no mouse
buttons are being pressed, initiate can be set to 1 so that next time you press
a mouse button it knows that it was newly pressed.
If you press a mouse button, and the mouse Y position is larger than 64 (so that
you're in the drawing area, not on the toolbar), the draw engine starts: if
initiate is true, it simply draws the brush at the current mouse position, sets
the old position to the current position, and sets initiate to 0 because when
you keep holding the mouse button, the next frame, the mouse isn't "just
pressed" anymore.
When the distance between the previous and current drawing position is large
enough, the drawBrush function can be called.
The next part of the loop checks if you're in the toolbar area and if so lets
you pick the color, the brightness, and, if you click on the Size or Step
indicators, asks you to enter a new value with the getScalar function.
Finally, the main loop draws the toolbar and redraws the screen.
        drawRect(0, 0, w - 1, 64, RGB_Gray);
        drawLine(0, 64, w - 1, 64, RGB_Black);
        drawToolbar();
        redraw();
    }
    return 0;
}
This is the drawBrush function that replaces the drawLine function. The first
two parameters, x1 and y1, are passed by reference, because they're a sort of
return value: they'll be set to the coordinates of the last filled circle drawn,
so that you can use that as position to compare the distance of the next brush
positions to.
If initiate is true, it draws that one disk at the mouse position, and since the
distance is 0, it won't draw any of the next disks.
In a while loop, it draws all the disks until the distance is shorter than
dictated by step. If the brush size is 1, it uses drawLine instead because this
looks nicer. The while loop also ends if the coordinates managed to jump over
the end position, which will let the distance increase again and end up in an
infinite loop. For that it uses the function "inBetween". This function returns
false if the point x is not between x1 and x2.
void drawBrush(int & x1, int & y1, int x2, int y2, ColorRGB color)
{
    int x = x1, y = y1;
    if(size > 1)
    {
        if(initiate) drawDisk(x, y, size / 2, color);

        int i = 0;
        while(distance2D(x, y, x2, y2) > (size * step / 100.0) && inBetween(x1, y1, x, y, x2, y2))
        {
            i++;
            x = int(x1 + i * (size * step / 100.0) * (x2 - x1) / distance2D(x1, y1, x2, y2));
            y = int(y1 + i * (size * step / 100.0) * (y2 - y1) / distance2D(x1, y1, x2, y2));
            drawDisk(x, y, size / 2, color);
        }
        x1 = x;
        y1 = y;
    }
    else //if brush size is 1, drawLine looks nicer
    {
        drawLine(x1, y1, x2, y2, color);
        x1 = x2;
        y1 = y2;
    }
}
The function drawToolbar again prints the color picker, and now also prints the
size and step value. The distance2D function simply uses the distance formula.
void drawToolbar()
{
    ColorRGB color;
    for(int x = 0; x < 128; x++)
    for(int y = 0; y < 64; y++)
    {
        color = HSVtoRGB(ColorHSV(x * 2, y * 4, brightness));
        pset(x, y, color);
    }
    for(int x = 128; x < 144; x++)
    for(int y = 0; y < 64; y++)
    {
        pset(x, y, ColorRGB(y * 4, y * 4, y * 4));
    }
    print("Size:", 144, 0);
    print(size, 184, 0);
    print("Step:", 144, 8);
    print(step, 184, 8);
}

double distance2D(int x1, int y1, int x2, int y2)
{
    return sqrt(double((x1 - x2) * (x1 - x2) + (y1 - y2) * (y1 - y2)));
}


//returns true if point2 is between point1 and point3 (the 3 points are
supposed to be on the same line)
bool inBetween(int x1, int y1, int x2, int y2, int x3, int y3)
{
    if((x1 - x2) * (x3 - x2) <= 0 && (y1 - y2) * (y3 - y2) <= 0) return true;
    else return false;
}
Here's something drawn with it:
Opacity
Opacity can be used to make the brush transparent. Opacity is the opposite of
transparency, in that opacity tells how opaque the brush is while transparency
tells how transparent the brush is. An opacity of 0 means the brush is invisible
(you can't paint with it), 128 means it's half translucent, and 255 means it's
opaque (you can't see any pixels through it).
For transparency, i.e. you can see the old pixels through what you draw, you
need to be able to read the old pixels, and for this it goes much quicker if we
draw to buffer and read the pixels from there. Also, the drawLine, drawDisk,
etc... functions can't be used anymore since they don't support transparency.
They'll all have to be remade. The new versions of these functions get the
prefix paint_, for example drawLine becomes paint_drawLine. The function
paint_pset draws a pixel like the old pset function, but with transparency. The
drawLine, drawDisk, horLine, ... functions are exactly the same except that they
call paint_pset and paint_horLine, so these functions aren't given here.
Here you can see the declarations of the new functions, clearScreenBuffer is
used instead of cls() because the buffer needs to be cleared instead of the
actual screen now. The value opacity is used for the opacity of the brush.
#define screenW 384
#define screenH 384

void drawToolbar();
void drawBrush(int & x1, int & y1, int x2, int y2, ColorRGB color);
double distance2D(int x1, int y1, int x2, int y2);
bool inBetween(int x1, int y1, int x2, int y2, int x3, int y3);
void paint_pset(int x, int y, ColorRGB color, Uint8 opacity);
bool paint_horLine(int y, int x1, int x2, ColorRGB color, Uint8 opacity);
bool paint_drawLine(int x1, int y1, int x2, int y2, ColorRGB color, Uint8 opacity);
bool paint_drawDisk(int xc, int yc, int radius, ColorRGB color, Uint8 opacity);
void clearScreenBuffer(ColorRGB color);

Uint8 brightness = 255; //for the color picker
int size = 25, step = 10; //brush size and step
Uint8 opacity = 16;
bool initiate; //when you just start pressing mouse button

Uint32 screenBuffer[screenW][screenH];

double frameTime, oldFrameTime;

int main(int argc, char *argv[])
{
    screen(screenW, screenH, 0, "Painting");
    clearScreenBuffer(RGB_White);
    int mouseX, mouseY;
    int oldMouseX, oldMouseY;
    bool LMB, RMB;
    ColorRGB fore = RGB_Black; //foreground color
    ColorRGB back = RGB_White; //background color
In the main loop, almost nothing changes, apart from the fact that it uses
"drawBuffer", and the Opacity selector in the toolbar. The "opacityNoWrap"
variable is used because opacity is a Uint8 and thus values will wrap around, if
you type a value that's too high or too low, and it's nicer to let it set the
maximum or minimum instead in these cases. Another change is that it'll redraw
the screen and the buffer only every 20 milliseconds so that it goes faster at
higher resolutions.
The drawBrush function is almost the same as before, the only difference is that
it uses paint_drawDisk and paint_drawLine, with the opacity parameter. The
functions paint_drawLine, paint_horLine and paint_drawDisk aren't given here
either, all these functions can be found in the downloadable c++ file.
The paint_pset function adds a new pixel to the screenBuffer, it uses the
weighed average of the new and old pixel value with "opacity" and "256 -
opacity" to do the transparency. Since the screenBuffer uses a single integer
instead of 3 bytes for the color, the RGBtoINT function is used to convert the
color to integer.
The clearScreenBuffer function simply sets all pixels of the buffer to the given
color.
void clearScreenBuffer(ColorRGB color)
{
    for(int x = 0; x < w; x++)
    for(int y = 0; y < h; y++)
    {
        screenBuffer[x][y] = RGBtoINT(color);
    }
}
The drawToolbar function is almost the same except that it also prints the
Opacity, so isn't given here either.
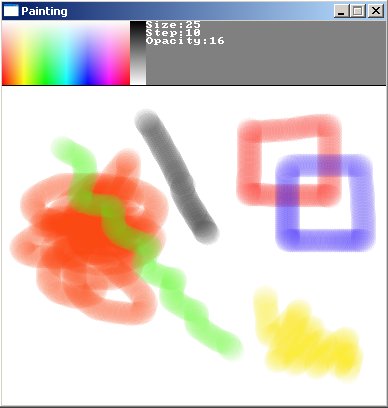
Here's one of the things you can do with transparent brushes:
Note that, because the brush overdraws itself a few times (if step is small),
it'll appear more opaque than it is according to it's setting. To overcome this,
you could make an extra buffer that, while you draw, remembers where you had
already drawn with the brush and doesn't overdraw these locations anymore. In
Paint Shop Pro this is possible by disabling the "Build up brush" setting.
This tutorial might be expanded with a section about "Hardness" later.