Understanding the Process of MIDlet Creation--Using the Toolkit
A D V E R T I S E M E N T
In the section Acquiring and Installing J2ME Development Kit above, you
downloaded the Toolkit and installed it in the folder C:\WTK22 (as far as
this article series is concerned; you may have downloaded and installed it in a
different folder). Let's explore the contents of this folder. Figure 4 shows
these contents as they should now look on your machine.
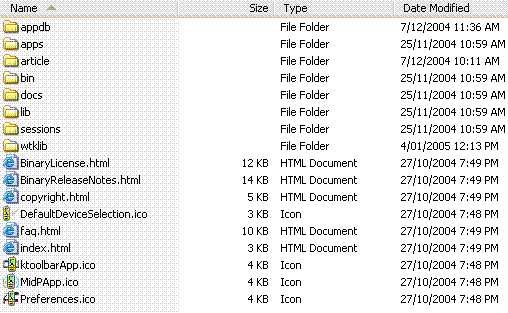
Figure 4. Wireless Toolkit folder contents
Note that the default installation of the Toolkit would not have
created the article folder, and that you created it in the previous
section.
As far as a MIDlet developer is concerned, the most important folders are the
apps and bin folders, but here is a short summary of each of these
folders.
| Folder Name |
Folder Description |
| appdb |
Directory that acts as a simulation for mobile device
file system |
| apps |
MIDlets created using the Toolkit reside in this
directory |
| bin |
Contains executables for the various tools, including
the Toolkit itself, and various other tools like the preverifier and the
emulator |
| docs |
The Wireless Toolkit documentation including API
documentation for MIDP 2.0 and MIDP 1.1 |
| lib |
Contains the JAR files for MIDP (both 2.0 and 1.1), CLDC
(both 1.1 and 1.0) and several other optional libraries |
| sessions |
Directory where network and profiling sessions are
maintained |
| wtklib |
Contains the libraries for the Toolkit itself, including
the properties of various device emulators |
The apps folder is the directory where all the MIDlets that are
created using the Toolkit are installed. Browse this folder, and you will notice
several example MIDlets provided in their own folders. These have their own
directory structure that allows clean separation of source code, libraries, and
rest of the files associated with a MIDlet project.
The bin folder contains the executables for the Toolkit. The most
important one is ktoolbar.exe (on Windows), which starts the main
interface window for the Toolkit. This folder contains other executables as
well, some of which we came across earlier (for example, preverify.exe
and emulator.exe). Let us, however, concentrate on using the
Toolkit now by running the ktoolbar.exe from the bin folder.
The Toolkit will start and you will get the window shown in Figure 5.
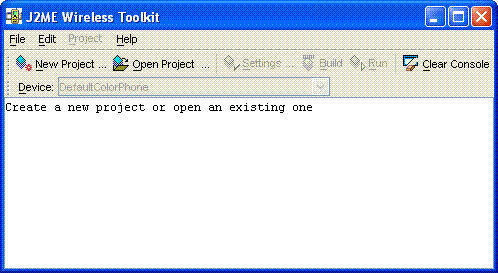
Figure 5. Main Toolkit window
As the message in the window says, from here, you can either create a new
project or open an existing one. When you click on the Open Project menu button,
you will be presented with a list of projects. As you may have guessed, this
list of projects is the directory listing of the apps folder. Selecting a
project from this list will open up the project and allow you to change its
settings, build it (which includes compilation, preverification, and packaging)
and run it. The steps of designing and coding are still to be done outside of
this Toolkit.
Let's use the Toolkit to create the Date-Time MIDlet from the previous
section. Click on New Project menu button, and enter the details in the window
that comes up, as shown in Figure 6.

Figure 6. Creating a new project
The next window that comes up will allow you to change settings that control
the target platform of your MIDlet. In this case, you want to target this MIDlet
towards the MIDP 2.0 and CLDC 1.1 platforms and therefore, keep the Target
Platform as JTWI, which preselects the MIDP 2.0 Profile. However, you will need
to change the Configuration to CLDC 1.1 and uncheck the Optional Mobile Media
API library, as shown in Figure 7.
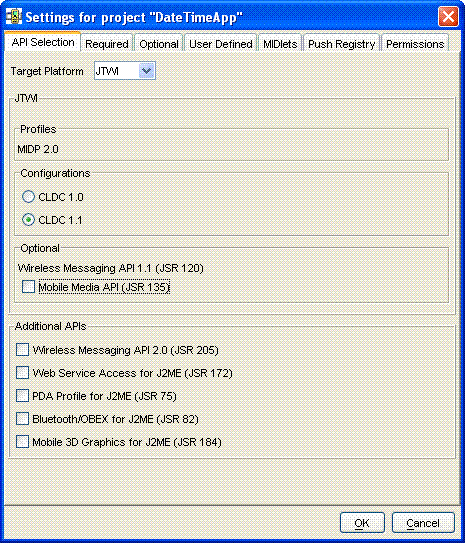
Figure 7. Changing project settings
You can review the rest of the settings by clicking on the tabs at the top,
but for the moment, your project is ready to be created. Do so by clicking the
OK button at the bottom. The project will be created with information about
where to place the project files displayed on the screen, as shown in Figure 8.
You can verify that the Toolkit has created a DateTimeApp folder under
the apps folder by navigating to it.
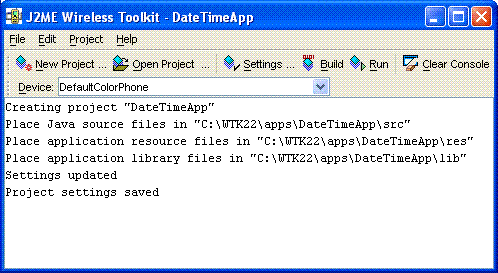
Figure 8. Project DateTimeApp created
You have already created the only required src file for this MIDlet in the
previous section. Copy this file, DateTimeApp.java, from the folder
C:\WTK22\article\com\j2me\part1\ to the fully qualified src folder (C:\WTK22\apps\DateTimeApp\src\com\j2me\part1).
Note that the Toolkit created the fully qualified path based on the package
name, so you don't have to. Once the copy is done, come back to the Toolkit, and
hit the Run menu button. The Toolkit will compile, preverify, and package, and,
provided everything goes OK, will run the DateTimeApp in the emulator. Seems
simple enough, doesn't it? All you had to do was to create a new project, set
the settings, write the code, drop it in the right directory, and hit the Run
button. The Toolkit took care of the rest.
Before you leave this section, examine the rest of the folders under the
DateTimeApp project. The bin folder under the DateTimeApp folder
contains the JAD and the Manifest files, while the classes folder
contains compiled classes. But where is the JAR file for this MIDlet? Well, the
JAR file is not created by just running (or building) your application in the
Toolkit. To create the JAR file, you will need to select the Project menu item,
and then select one of the options under the Package submenu, as shown in Figure
9.
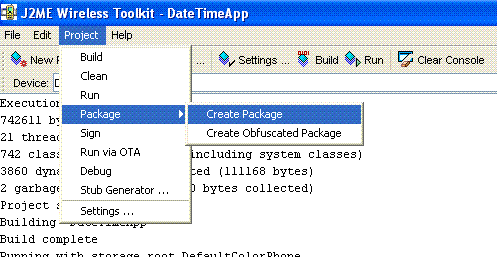
Figure 9. Creating the MIDlet's JAR file
By creating this package, the JAR file will be created, with correct Manifest
information in the JAD file. You can even create the HTML file that we created
in the deploy section previously, by clicking on the Run via OTA (Over The Air)
menu. This will not only allow you to simulate your emulator running this MIDlet
via the Internet, but also create the HTML file for you in the bin
folder. Before you can use this HTML file to deploy on your own server, along
with the JAD and the JAR files, you will need to change the hostname, which
defaults to "localhost."
You now know how to create a simple MIDlet, both using the Toolkit, and
without it. It's now time to look at the MIDlet lifecycle to understand what
actually happens when your MIDlet is deployed and run.
|
