Adding More Sprites and Detecting Collisions
A D V E R T I S E M E N T
What fun is a single lonely sprite jumping around for no obvious purpose?
It's time to introduce another sprite, in the form a car sprite that will
randomly appear at several locations across the game screen. The jumping/shining
couple will need to bump into these evil car manifestations to defeat
them! The more cars that are hit by the couple in a fixed time, the higher the
score.
With the game objectives now clear, let's first create a class that will keep
track of the time so that the game can be stopped once the time has expired.
Listing 4 shows the code for the Clock class.
package com.j2me.part3;

import java.util.TimerTask;

public class Clock extends TimerTask {

  int timeLeft;

  public Clock(int maxTime) {
    timeLeft = maxTime;
  }

  public void run() {
	timeLeft--;
  }

  public int getTimeLeft() { return this.timeLeft; }
}
Listing 4. The Clock class that will keep track of the game
time
The Clock class extends the TimerTask class, whose
run() method gets executed after a predefined time. Here, it
reduces the maxTime variable every second, which helps us keep
track of the time. To use the Clock class, create and start it just
before the infinite loop inside of the run() method of the
MyGameCanvas class is executed, as shown here:
// before going in the loop, start the timer clock with a
// 30 seconds countdown
clock = new Clock(30);
new Timer().schedule(clock, 0, 1000);
Of course, now the infinite loop must be preempted with a flag that stops the
loop from running when the time has expired. To do this, define a Boolean flag
called stop, as shown here:
// the flag that tells the game to stop
private Boolean stop = false;
Use it in the while loop as while(!stop) and enter
the first lines of code in the verifyGameState() method:
private void verifyGameState() {

  if(clock.getTimeLeft() == 0) {
	stop = true;
	return;
  }
}
Finally, the user needs to be informed of the time left in the game. To do
this, add a method called showTimeLeft(Graphics g), as shown here:
private void showTimeLeft(Graphics g) {

  // what does the clock say
  int timeLeft = clock.getTimeLeft();

  // if less than 6 seconds left
  // flicker time with red and black
  if(timeLeft < 6) {
	if((timeLeft % 2) == 0)
	  g.setColor(0xff0000);
	else
	  g.setColor(0x000000);
  }

  // draw the time left string
  g.drawString("Time Left: " + timeLeft + " seconds", 0, 0, 0);

  // reset the color
  g.setColor(0x000000);

}
This is called at the end of the buildGameScreen() method.
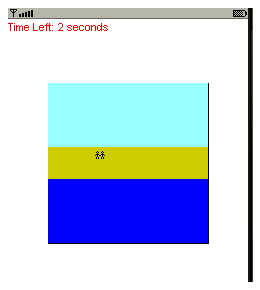
Figure 8 shows a snapshot of the game as it looks now.

Figure 8. Game with time left showing
It is time to add a new (actually several new) sprites into this game.
Listing 5 shows the code for the car sprite in a separate class called
CarSprite. This code uses the image of a car shown in Figure 9.

Figure 9. Image for car sprite
package com.j2me.part3;

import java.util.Random;
import javax.microedition.lcdui.Image;
import javax.microedition.lcdui.game.Sprite;
import javax.microedition.lcdui.game.LayerManager;

public class CarSprite implements Runnable {

  public CarSprite(MyGameCanvas parent) {

	this.parent = parent;
	this.manager = parent.getManager();

  }

  public void start() {

	// first load the car image
	try {
	  carImage = Image.createImage("/car.gif");
	} catch(Exception e) { System.err.println(e); return; }

	// next start the thread that will display cars
	// are random locations
	runner = new Thread(this);
	runner.start();
  }

  public void run() {

	try {
	  while(true) {

	    // create a random car
	    randomCar();

	    // wait before creating another one
	    Thread.currentThread()Sleep(500);
	  }
	} catch(Exception e) { System.err.println(e); }
  }

  // creates and displays a car at a random location
  private void randomCar() {

	// if maximum cars are being shown return
	if(currentCars == MAX_CARS) return;

	// create a new car sprite
	carSprite = new Sprite(carImage, 10, 10);

	// generate the random places where cars may appear
	int randomCarX = parent.getRandom().nextInt(parent.GAME_WIDTH);
	int randomCarY =
	  (parent.BASE -
	    parent.getRandom().nextInt(parent.MAX_HEIGHT + 1) -
	    carSprite.getHeight());

	// make sure that these places are within bounds
	if(randomCarX < parent.GAME_ORIGIN_X) randomCarX = parent.CENTER_X;
	if(randomCarY < (parent.BASE - parent.MAX_HEIGHT))
	  randomCarY = parent.CENTER_Y;

	// set this newly created car sprite in its random position
	carSprite.setPosition(randomCarX, randomCarY);

	// add it to the manager at index 0
	manager.insert(carSprite, 0);

	// increase the no of cars created
	currentCars++;

  }

  public void checkForCollision() {

	// if there are no cars being shown (only background and couple)
	if(manager.getSize() == 2) return;

	// iterate through the layers, remember don't worry about
	// the last two because they are the couple and background
	for(int i = 0; i < (manager.getSize() - 2); i++) {

	  // if collision occurs
	  if(parent.getCoupleSprite().collidesWith(
		(Sprite)manager.getLayerAt(i), true)) {

	    // remove the offending car
	    manager.remove(manager.getLayerAt(i));

	    // reduce the no of cars on display
	    currentCars--;

	    // and increase the no of cars hit
	    carsHit++;

	  }
	}
  }

  // the no of cars hit
  public int getCarsHit() {
	return carsHit;
  }

  // the car sprite
  private Sprite carSprite;

  // the car image
  private Image carImage;

  // the no of current cars in display
  private int currentCars;

  // the parent canvas
  private MyGameCanvas parent;

  // the parent canvas's layer manager
  private LayerManager manager;

  // runner
  private Thread runner;

  // tracks the no of cars hit
  private int carsHit;

  // the maximum no of cars to create
  private static final int MAX_CARS = 20;

}
Listing 5. Code to create several car sprites
The CarSprite class implements Runnable, as it
needs to spawn several new car sprites every half a second. The run()
method calls the randomCar() method after sleeping for 500
milliseconds. The randomCar() method checks if the number of
existing car sprites hasn't exceeded the limit, then creates a new sprite using
the car image loaded earlier. It then calculates a random position for this
sprite to appear at, making sure that this random position is within the game
bounds. It sets this newly created sprite in this random position and adds the
sprite to the LayerManager at index 0, so that it becomes the most
recent (and closest to the user) sprite.
This class also provides a method to check for collision of the couple with
the random cars. The checkForCollision() method iterates through
the current car sprites being shown by the LayerManager, and uses
the collidesWith() method of the Sprite class to check
for collision. This method returns a Boolean true when collision has occurred,
and accepts a layer, an image, or another with which sprite to check collision.
It also accepts a flag to indicate if collision detection should take into
account the transparent pixels around an image, or only opaque pixels. When a
collision is detected, the number of cars hit is incremented and the number of
cars visible is decremented.
To use the CarSprite class, append the following lines of code
at the end of the start() method of the MyGameCanvas
class.
// create the car sprite thread and start it
carSprite = new CarSprite(this);
carSprite.start();
Also add the following line of code at the end of the verifyGameState()
method.
carSprite.checkForCollision();
Thus, the CarSprite thread starts spawning new cars, up to a
maximum number of cars. Once the user hits a car by moving the
jumping/shining couple with an unpredictable bounce, the car disappears. This is
checked in the verifyGameState() method by calling the
checkForCollision() method on the CarSprite thread. More
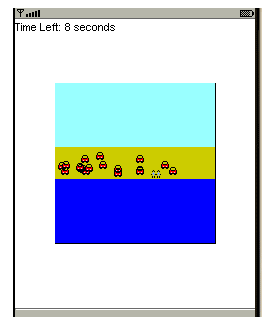
cars keep appearing till the time runs out. Figure 10 shows a typical game in
progress.

Figure 10. A typical game in progress after adding the car sprites
All that is left now is to inform the user about the number of cars that he
has hit. After the while() loop has exited, add a call to a new
method called showGameScore(getGraphics()), and add this new method
as shown here:
// at the end of the game show the score
  private void showGameScore(Graphics g) {

  // create a base rectangle
  g.setColor(0xffffff);
  g.fillRect(0, CENTER_Y - 20, getWidth(), 40);

  g.setColor(0x000000);

  // and show the score
  g.drawString("You hit " +
    carSprite.getCarsHit() + " cars.",
    CENTER_X, CENTER_Y,
    Graphics.HCENTER | Graphics.BASELINE);

  flushGraphics();
}
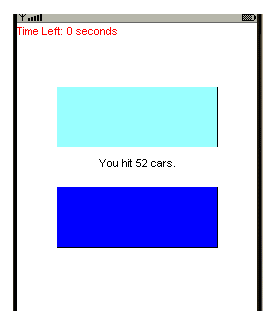
This draws a small rectangle in the middle of the screen at the end of the
game showing the number of cars hit by the player. A typical game ending is
shown in Figure 11.

Figure 11. A typical game ending and the message displayed
You can, of course, display this information in any format or location that
you want.
Conclusion
This part of the J2ME tutorial series was a long-winded but comprehensive
look at the gaming API of MIDP 2.0. You learned how to use the classes of this
API using a full-fledged example and built a game successfully. You also learned
the basics of game building through this example.
In the next few parts of this tutorial, you will learn how to add multimedia
to your MIDlets, something that can be very useful in J2ME games. You will also
learn how to use the record-store management API to consistently store
information permanently.
|
