Mobile Media API (MMAPI) background
MMAPI defines the superset of the multimedia capabilities that are present in
MIDP 2.0. It started life as
JSR 135
A D V E R T I S E M E N T
and is currently at version 1.1. The current version includes some
documentation
changes and security updates, and is distributed as an optional jar file in
the J2ME wireless toolkit 2.2. Although the release notes for the toolkit state
that MMAPI 1.1 is bundled, the actual version is 1.0. I have
blogged about this before and have submitted an official bug with Sun.
The MMAPI is built on a high-level abstraction of all the multimedia devices
that are possible in a resource-limited device. This abstraction is manifest in
three classes that form the bulk of operations that you do with this API. These
classes are the Player and Control interfaces, and the
Manager class. Another class, the DataSource abstract
class, is used to locate resources, but unless you define a new way of reading
data you will probably never need to use it directly.
In a nutshell, you use the Manager class to create Player
instances for different media by specifying DataSource instances.
The Player instances thus created are configurable by using
Control instances. For example, almost all Player instances
would theoretically support a VolumeControl to control the volume
of the Player. Figure 1 shows this process.
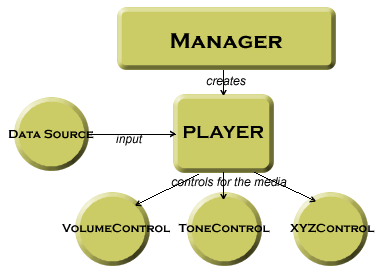
Figure 1. Player creation and management
Manager is the central class for creating players and it
provides three methods to indicate the source of media. These methods, all
static, are createPlayer(DataSource source),
createPlayer(InputStream stream, String type) and
createPlayer(String locator). The last method is interesting because it
provides a URI style syntax
for locating media. For example, if you wanted to create a Player
instance on a web based audio file, you can use
createPlayer("http://www.yourwebsite.com/audio/song.wav"). Similarly, to
create a media Player to capture audio, you can use
createPlayer("capture://audio"); and so on. Table 4.1 shows the supported
syntax with examples.
| Media Type |
Example syntax |
| Capture audio |
"capture://audio" to capture audio on the default audio
capture device or "capture://devmic0?encoding=pcm" to
capture audio on the devmic0 device in the PCM encoding |
| Capture video |
"capture://video" to capture video from the default
video capture device or "capture://devcam0?encoding=rgb888&width=100&height=50"
to capture from a secondary camera, in rgb888 encoding mode and with a
specified width and height |
| Start listening in on the built-in radio |
"capture://radio?f=105.1&st=stereo" to tune into 105.1
FM frequency and stereo mode |
| Start streaming video/audio/text from an external source |
"rtp://host:port/type" where type is one of audio,
video or text |
| Play tones and MIDI |
"device://tone" will give you a player that you can use
to play tones or "device://midi" will give you a player
that you can use to play MIDI |
Table 4.1. List of supported protocols and example syntax
A list of supported protocols for a given content type can be retrieved by
calling the method getSupportedProtocols(String contentType) which
returns a String array. For example, if you call this method with
the argument "audio/x-wav" it will return an array with three
values in it: http, file and capture for
the wireless toolkit. This lets you know that you can retrieve the content type
"audio/x-wav", by using http and file
protocols, and capture it using the capture protocol. Similarly, a
list of supported content types for a given protocol can be accessed by calling
the method getSupportedContentTypes(String protocol). Thus, calling
getSupportedContentTypes("capture") will return audio/x-wav
and video/vnd.sun.rgb565 for the wireless toolkit, indicating that
you can capture standard audio and rgb565 encoded video. Note that passing null
in any of these methods will return all supported protocols and content types
respectively.
Once a Player instance is created using the Manager
class methods, it needs to go through various stages before it can be used. Upon
creation, the player is in an UNREALIZED state and must be
REALIZED and PREFETCHED before it can be STARTED.
Realization is the process in which the player examines the source or
destination media resources and has enough information to start acquiring them.
Prefetching happens after realization and the player actually acquires these
media resources. Both realization and prefetching processes may be time- and
resource-consuming, but doing them before the player is started ensures that
there is no latency when the actual start happens. Once a player is started,
using the start() method, and is processing media data, it may
enter the PREFETCHED state again when the media processing stops on
its own (because the end of the media was reached, for example), you explicitly
call the stop() method on the Player instance, or when
a predefined time (called TimeBase) is reached. Going from
STARTED to PREFETCHED state is like pausing the player, and
calling start() on the Player instance restarts from
the previous paused point (if the player had reached the end of the media, this
means that it will restart from the beginning).
Good programming practice requires that you call the realize()
and prefetch() methods before you call the start()
method to avoid any latency when you want the player to start. The start()
method implicitly calls the prefetch() method (if the player is not
in a PREFETCHED state), which in turn calls the realize()
method (if the player is not in a REALIZED state), but if you
explicitly call these methods first, you will have a Player
instance that will start playing as soon as you call start(). A
player can go into the CLOSED state if you call the close()
method on it, after which the Player instance cannot be reused. Instead of
closing, you can deallocate a player by calling deallocate(), which
returns the player to the REALIZED state, thereby releasing all the
resources that it would have acquired.
Figure 2 shows the various states and the transitions between them.
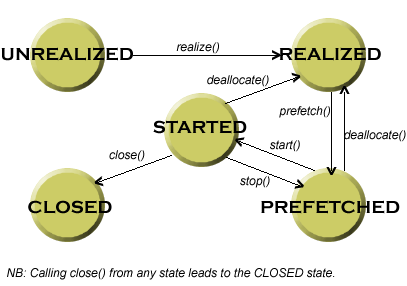
Figure 2. Media player states and their transitions
Notification of the transitions between different states can be delivered to
attached listeners on a player. To this end, a Player instance
allows you to attach a PlayerListener by using the method
addPlayerListener(PlayerListener listener). Almost all transitions states
are notified to the listener via the method playerUpdate(Player player,
String event, Object eventData).
A player also enables control over the properties of the media that it is
playing by using controls. A control is a media processing function that
may be typical for a particular media type. For example, a VideoControl
controls the display of video, while a MIDIControl provides access
to MIDI devices' properties. There are, of course, several controls that may be
common across different media, VolumeControl being an example.
Because the Player interface extends the Controllable
interface, it provides means to query the list of the available controls. You do
this by calling the method getControls(), which returns an array of
Control instances, or getControl(String controlType),
which returns an individual Control (null if the
controlType is not supported).
As I said earlier, MIDP 2.0 contains a subset of the broad MMAPI 1.1. This is
to ensure that devices that only support MIDP 2.0 can still use a consistent
method of discovery and usage that can scale if the broader API is present. The
subset only supports tones and audio with only two controls for each,
ToneControl and VolumeControl. Additionally, datasources are
not supported, and hence, the Manager class in MIDP 2.0 is
simplified and does not provide the createPlayer(DataSource source)
method.
In the next few sections, you will learn how to play audio and video from a
variety of sources in your multimedia MIDlets.
|