The FOR XML clause is only valid in a SELECT statement (it
can not be used with INSERT, UPDATE, etc.) and returns the results of the SELECT
statement in a variety of XML formats, which we will cover shortly.
Let's take a look at the following familiar SELECT statement:
SELECT Employee_ID, First_Name_VC, Last_Name_VC
FROM Employee_T
Execution of this SELECT statement in the Query Analyzer
produces the following results. These are the standard results that we are used
to seeing:
Employee_ID First_Name_VC  Last_Name_VC
----------- --------------- ---------------
1      Thearon     Willis
2      Michael     Dell
4      Cheryl     Carson
If we take the same SELECT statement shown above and add the
FOR XML clause:
SELECT Employee_ID, First_Name_VC, Last_Name_VC
FROM Employee_T FOR XML RAW
we see a totally different set of results:
XML_F52E2B61-18A1-11d1-B105-00805F49916B
-----------------------------------------------------------------------
<row Employee_ID="1" First_Name_VC="Thearon" Last_Name_VC="Willis"/>
<row Employee_ID="2" First_Name_VC="Michael" Last_Name_VC="Dell"/>"/>
<row Employee_ID="4" First_Name_VC="Cheryl" Last_Name_VC="Carson"/>
Notice that our data now looks similar to our XML example
that we displayed earlier. In the output above, row is an element and the
remaining data has been specified as attributes of that element. Each row of
data in our Employee_T table has been specified as a separate row element.
The actual amount of data that is displayed in the results window of the
Query Analyzer is limited. To increase the display limit click on the Tools menu
and select the Options menu item. Then click on the Results tab and enter a
large value, such as 1000, in the Maximum characters per column text box. Then
click the OK button to close the Options dialog.
The syntax for the FOR XML clause is shown next:
FOR XML mode [,XMLDATA] [,ELEMENTS][,BINARY Base64]
In the syntax above the mode argument specifies the shape of
the XML data returned. There are three possible values for mode: RAW, AUTO, and
EXPLICIT. The RAW mode produces XML results that are formatted using default
element names, while AUTO mode produces results using the table and column names
as the element and attribute names. EXPLICIT mode is much more complex and you
must specify the element names and nesting required. In short, you must specify
the shape of the XML document in your query.
The partial results shown below (for just one row in the table) represent data
formatted using RAW and AUTO modes respectively:
<row Employee_ID="1" First_Name_VC="Thearon" Last_Name_VC="Willis"/>

<Employee_T Employee_ID="1" First_Name_VC="Thearon"
Last_Name_VC="Willis"/>
The optional XMLDATA, ELEMENTS, and BINARY Base64 arguments
can only be used with the AUTO mode. These arguments further define how the XML
data should be formatted. For example, the XMLDATA argument specifies that an
XML-Data schema should be returned with your XML data, while the ELEMENTS
argument specifies that your XML data be returned in elements, instead of as
attributes on a single element. The BINARY Base64 argument specifies that binary
data be returned in the binary base64-encoded format, and this is the default
argument for AUTO mode. Binary base64 is a standard content transfer encoding
method used to encode data to be sent to a browser. The browser then decodes the
data and displays it in a readable form.
Try It Out - Using the FOR XML Clause
To illustrate the points discussed so far, let's create and execute some simple
queries in the Query Analyzer that use the FOR XML clause. We will use the
SELECT query that we saw earlier. If you have not already done so, increase the
maximum characters that are displayed in the results window in the Query
Analyzer.
1. The first query that we want to run will use the AUTO mode in the FOR
XML clause. Enter and execute the following query:
SELECT Employee_ID, First_Name_VC, Last_Name_VC
FROM Employee_T FOR XML AUTO
XML_F52E2B61-18A1-11d1-B105-00805F49916B
-------------------------------------------------------
<Employee_T Employee_ID="1" First_Name_VC="Thearon"
Last_Name_VC="Willis"/>
<Employee_T Employee_ID="2" First_Name_VC="Michael"
Last_Name_VC="Dell"/>
Each element in the results represents one row from the
Employee_T table, and the element name is the table name. This has been done
automatically for you because you specified the AUTO argument.
2. Now enter and execute the following query. It might be useful to open
a new query window instead of clearing the current query window. This will allow
you to switch between the various query windows to view the different results
that are generated.
SELECT Employee_ID, First_Name_VC, Last_Name_VC
FROM Employee_T FOR XML AUTO, XMLDATA
This example not only displays the XML data but it also
returns a schema that further defines the elements and attributes of your XML
data. When you run your query, the schema is displayed first, followed by the
ElementType and then the AttributeType.
Notice in the partial results below, taken from the schema, that the
AttributeType for each of the columns specified in the SELECT statement is
displayed. Each AttributeType has a name assigned and the data type specified.
We'll be discussing AttributeType later in this chapter.
<AttributeType name="Employee_ID" dt:type="i4"/> <AttributeType
name="First_Name_VC" dt:type="string"/> <AttributeType name="Last_Name_VC"
dt:type="string"/>
3.The next query that we want to execute is shown
below and uses the ELEMENTS argument. Enter and execute this query:
SELECT Employee_ID, First_Name_VC, Last_Name_VC
FROM Employee_T FOR XML AUTO, ELEMENTS
This query displays all of the XML data as elements and looks
very similar to the first example that we saw in this chapter:
XML_F52E2B61-18A1-11d1-B105-00805F49916B
-----------------------------------------------------
<Employee_T><Employee_ID>1</Employee_ID>
<First_Name_VC>Thearon</First_Name_VC>
<Last_Name_VC>Willis</Last_Name_VC></Employee_T>
So what we have seen here is that by using the FOR XML clause
on a SELECT statement, we can return XML formatted data directly in the Query
Analyzer. We can also display XML data formatted in a variety of ways depending
on the intended use of the data, such as displaying it in a browser or sending
it through a B2B application.
Selecting XML Data in a URL
When we set up a virtual directory for SQL Server in the last chapter, we
selected data from the database in a URL to test the successful implementation
of our virtual directory. This is where the real power of SQL Server and XML
comes into play. This section takes a look at the basics of using the URL to
return XML data from SQL Server.
As we saw in the last chapter, we can execute queries from a browser using the
virtual directory that we set up. The query that we executed in the last chapter
was entered in the URL as:
http://localhost/htdata?sql=SELECT * FROM Employee_T
WHERE Employee_ID=1 FOR XML AUTO
When we pressed the Enter key, Internet Explorer replaced all
spaces in the URL with a hexadecimal value of %20. This is because we cannot use
spaces in a URL. This makes the URL cluttered and hard to read. What we can do
is use the special character of a plus sign (+) to represent a space. The
browser will not replace this special character with its equivalent hexadecimal
value and our URL is much easier to read.
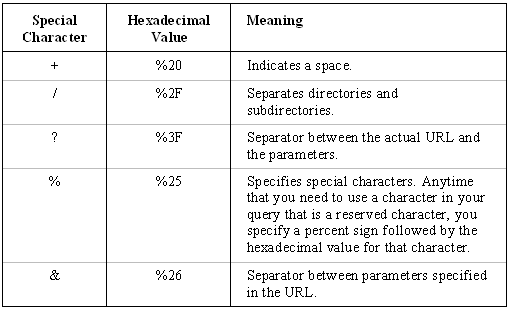
There are also a few other special characters that we should look at before
continuing. The following table lists the special characters that will be used
throughout the rest of this chapter:

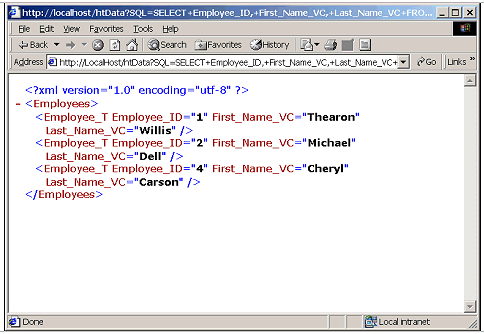
When we display XML data, a top-level element, known as a
root element or root node, is required. The example shown in the figure earlier
indicates that Employees is the root element and under Employees there were many
Employee elements that each represented a single employee. XML is like a tree -
we start with a single root and then we grow and branch out from there.
The example URL above only extracted one record (where the employee ID = 1) and
displayed it in the browser. Let's take a look at an example that will select
certain columns and all rows from the Employee_T table and display the results
in a browser.
Try It Out - SELECT Statement in a URL
In this exercise we want to enter a query in a URL that will select the
Employee_ID, First_Name_VC, and Last_Name_VC columns for all rows in the
Employee_T table.
1. To illustrate our point about the root element in an XML document,
enter the following URL in a browser:
http://localhost/htData?SQL=SELECT+Employee_ID,
+First_Name_VC,+Last_Name_VC+FROM+Employee_T+FOR+XML+AUTO
You will receive this error message, "Only one top level
element is allowed in an XML document. Line 1, Position 77, and your XML data
will be displayed as one continuous line of data. This error indicates that the
XML is not well-formed and that a root element is required.
2. In order to resolve this problem we can specify the Root keyword as a
parameter in our URL. The name that you assign to the Root keyword should
describe the data being displayed.
Enter the following URL in a browser:
http://localhost/htData?SQL=SELECT+Employee_ID,+First_Name_VC,
+Last_Name_VC+FROM+Employee_T+FOR+XML+AUTO&Root=Employees
You should now see the data from the Employee_T table
displayed as XML in the browser, as shown in the following screenshot. Notice
that Employees is the name of the root element. You can experiment with this by
giving the root a different name and running the query again.

Now that we have executed a query in a URL and displayed XML
data in a browser, let's take a more detailed look at the URL syntax. The syntax
below shows the basic URL that can be executed:
http://iisserver/virtualroot?{sql=SQLString | template=XMLTemplate}
[¶m=value[¶m=value]...n]
In this syntax, iisserver represents the machine name that
IIS is installed on. If IIS is installed on your local machine then you can
specify localhost for iisserver, otherwise you would specify the machine name
where IIS is installed.
The virtualroot argument specifies the virtual directory. In our case this
virtual directory was set up, in the last chapter, with a name of htData.
The optional ?sql argument specifies that a SQL string or stored procedure is to
be executed. This is followed by the SQLString argument, which specifies the
actual SQL string or stored procedure that will be executed.
The optional argument, ?template, specifies an XML document that contains a
query string to be executed. The query string can be a SQL statement, stored
procedure, or a table name. This is a more secure way of allowing users access
to our data and we'll cover this later in the chapter.
The optional ?param arguments represent parameter names or keywords. Valid
keywords are ContentType, OutputEncoding, Root, and XSL. ContentType specifies
the content type of the returned documents. There are various options for this
but the one that we will be using is text/XML, which identifies the document as
text and HTML. OutputEncoding indicates what character set is to be used for the
output. The encoding used by default is UTF-8. The Root keyword, as we have
seen, allows us to specify the root element for our XML document. The XSL
keyword allows us to specify an XSL document that will be used to format the
results of our XML document. We'll be using this keyword in the next section.
