| HTML Tutorials |
|
|
| XML Tutorials |
|
|
| Browser Scripting |
|
|
| Server Scripting |
|
|
| .NET (dotnet) |
|
|
| Multimedia |
|
|
| Web Building |
|
|
| Java Tutorials |
|
|
| Programming Langauges |
|
|
| Soft Skills |
|
|
| Database Tutorials |
|
|
| Operating System |
|
|
| Software Testing |
|
|
| SAP Module |
|
|
| Networking Programming |
|
|
| Microsoft Office |
|
|
| Accounting |
|
|
|
 |
 |
|
Die Steuereigenschaften
|

|
Bevor Sie ein Fallverfahren f�r Steuerung zur Antwort zum Eingang eines Benutzers schreiben, mu�t du bestimmte Eigenschaften einstellen, damit damit die Steuerung sein Aussehen und wie es mit dem Fallverfahren funktioniert und dich kann die Eigenschaften der Kontrollen im Eigenschaften Fenster oder an der Laufzeit auch einstellen feststellt.
�ber Abbildung ist ein typisches Eigenschaften Fenster f�r eine Form. Du kannst den Formuntertitel zu jedem m�glichem Namen umbenennen, da� du gut und im Eigenschaften Fenster magst, das Einzelteil erscheinst am Oberteil bist der Gegenstand, der z.Z. vorgew�hlt wird (in der Abbildung oben, ist der vorgew�hlte Gegenstand Form1). Am unteren Teil stellen die Einzelteile, die in der linken Spalte verzeichnet werden, die Namen der verschiedenen Eigenschaften dar, die mit dem vorgew�hlten Gegenstand verbunden sind, w�hrend die Einzelteile, die in der rechten Spalte verzeichnet werden, die Zust�nde der Eigenschaften darstellen und Eigenschaften, indem man die Einzelteile in der rechten Spalte, eingestellt werden k�nnen hervorhebt �ndern sie dann, indem man die vorhandenen Wahlen schreibt oder vorw�hlt. Z.B. zwecks den Untertitel, den gerechten H�hepunkt Form1 unter dem Namen Untertitel �ndern und ihn zu den anderen Namen �ndern. Du kannst auch versuchen, das Aussehen der Form zu �ndern, indem Sie sie auf Ebene oder 3D einstellen. Andere Sachen, die du tun kannst, sind, seinen Hintergrund zu �ndern und Vordergrundfarbe, die Schriftkegelart und die Schriftkegelgr��e zu �ndern, zu erm�glichen oder zu sperren setzen herab und maximieren Tasten und etc.
Du kannst die Eigenschaften an der Laufzeit auch �ndern verleihst spezielle Wirksamkeiten wie �nderung der Farbe, des Animationeffektes und der Form und so weiter. Z.B. �ndert der folgende Code die Formfarbe zum hexadezimalen System des Rotes, jedesmal wenn die Form wird geladen und DES VB Gebrauches, um die Farbe darzustellen. Du kannst die Farbe Codes in den Eigenschaften Fenstern �berpr�fen, die oben unter BackColor und ForeColor gezeigt werden.
|
Private Sub Form_Load()
Form1.Show
Form1.BackColor = &H000000FF&
End Sub
|
|
| Behandlung einige der allgemeinen Kontrollen
|
|
1.The Text Box
|
|
The text box is the standard control that is used to receive input from the user and also to display the output. It can handle string (text) and numeric data but not pictures or images.
String in a text box can be converted to a numeric data by using the function Val(text) and the following example illustrates a simple program that processes the inputs from the user.
|
|
In diesem Programm werden zwei Textk�sten in die Form zusammen mit einigen Aufklebern eingesetzt und die zwei Textk�sten werden benutzt, um Eing�nge vom Benutzer anzunehmen und einer der Aufkleber wird benutzt, um die Summe von zwei Zahlen anzuzeigen, die in die zwei Textk�sten eingetragen sind. Au�erdem mit dem Plusoperator wird eine Befehl Taste auch programmiert, um die Summe der zwei Zahlen zu errechnen.
|
Private Sub Command1_Click()
�To add the values in text box 1 and text box 2
Sum = Val(Text1.Text) + Val(Text2.Text)
�To display the answer on label 1
Label1.Caption = Sum
End Sub
|
|
|
2.The Label
|
|
The label is a very useful control for Visual Basic, as it is not only used to provide instructions and guides to the users, it can also be used to display outputs and one of its most important properties is Caption. Using the syntax label.Caption, it can display numeric and text data .
You can change its caption in the properties window and also at the runtime.
|
|
3.The Command Button
|
|
The command button is a very important control as it is used to execute commands and it displays an illusion that the button is pressed when the user click on it.
The most common event associated with the command button is the Click event, and the syntax for the procedure is as follows:
|
Private Sub Command1_Click ()
Statements
End Sub
|
|
|
4.The Picture Box
|
|
The Picture Box is one of the controls that used to handle graphics and you can load a picture at design phase by clicking on the picture item in the properties window and select the picture from the selected folder. You can also load the picture at runtime using the LoadPicture method and for example,the statement will load the picture grape.gif into the picture box.
|
|
Picture1.Picture=LoadPicture ("C:\VB program\Images\grape.gif")
|
|
|
5.The Image Box
|
|
The Image Box is another control that handles images and pictures and it functions almost identically to the picture box. However, there is one major difference, the image in an Image Box is stretchable, which means it can be resized and this feature is not available in the Picture Box. Similar to the Picture Box,to load the picture it can also use the LoadPicture method.
For example, the statement loads the picture grape.gif into image box.
|
|
Image1.Picture=LoadPicture ("C:\VB program\Images\grape.gif")
|
|
|
6.The List Box
|
|
The function of the List Box is to present a list of items where the user can select and click the items from the list.
In order to add items to the list, we can use the AddItem method and for example, if you wish to add a number of items to list box 1, you can key in the following statements
|
Private Sub Form_Load ( )
List1.AddItem �Lesson1�
List1.AddItem �Lesson2�
List1.AddItem �Lesson3�
List1.AddItem �Lesson4�
End Sub
|
|
|
Anmerkung: Die Einzelteile im Liste Kasten k�nnen durch die ListIndex Eigenschaft gekennzeichnet werden und der Wert des ListIndex f�r das erste Einzelteil ist 0, hat das zweite Einzelteil ein ListIndex 1, und das zweite Einzelteil hat ein ListIndex 2 und so weiter
|
|
7.The Combo Box
|
|
The function of the Combo Box is also to present a list of items where the user can select and click the items from the list. However, the user needs to click on the small arrowhead on the right of the combo box to see the items which are presented in a drop-down list and in order to add items to the list, you can also use the AddItem method.
For example, if you wish to add a number of items to Combo box 1, you can key statements as follows
|
Private Sub Form_Load ( )
Combo1.AddItem �Item1�
Combo1.AddItem �Item2�
Combo1.AddItem �Item3�
Combo1.AddItem �Item4�
End Sub
|
|
|
8.The Check Box
|
|
The Check Box control lets the user to unselect or select an option. When the Check Box is checked, its value is set to 1 and when it is unchecked, the value is set to 0 and you can include the statements Check1.Value=1 to mark the Check Box and Check1.Value=0 unmark the Check Box, and use them to initiate certain actions. For example, the program will change the background color of the form to red when the check box is unchecked and when the check box is checked it will change to blue.
You will learn about the conditional statement If�.Then�.Elesif in later lesson and vbBlue and VbRed are color constants and BackColor is the background color property of the form.
|
Private Sub Check1_Click ()
If Check1.Value = 0 Then
Form1.BackColor = vbRed
ElseIf Check1.Value = 1 Then
Form1.BackColor = vbBlue
End If
End Sub
|
|
|
9.The Option Box
|
|
The Option Box control also lets the user select one of the choices.
However, two or more Option Boxes must work together because as one of the Option Boxes is selected and the other Option Boxes will be unselected. In fact, only one Option Box can be selected at one time. When an option box is selected, its value is set to �True� and its value is set to �False� when it is unselected. In the following example, the shape control is placed in the form together with six Option Boxes and when the user clicks on different option boxes, different shapes will appear.
The values of the shape control are 0, 1, and 2,3,4,5 which will make it appear as a rectangle,an oval shape, a square , a rounded rectangle and a rounded square respectively.
|
Private Sub Option1_Click ( )
Shape1.Shape = 0
End Sub
Private Sub Option2_Click()
Shape1.Shape = 1
End Sub
Private Sub Option3_Click()
Shape1.Shape = 2
End Sub
Private Sub Option4_Click()
Shape1.Shape = 3
End Sub
Private Sub Option5_Click()
Shape1.Shape = 4
End Sub
Private Sub Option6_Click()
Shape1.Shape = 5
End Sub
|
|
|
10.The Drive List Box
|
|
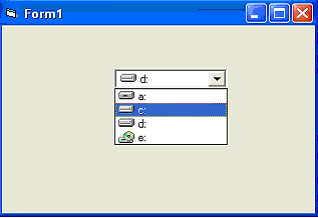
The Drive ListBox is used to display a list of drives available in your computer and when you place this control into the form and run the program, you will be able to select different drives from your computer as shown in the following figure.
|

|
|
11.The Directory List Box
|
|
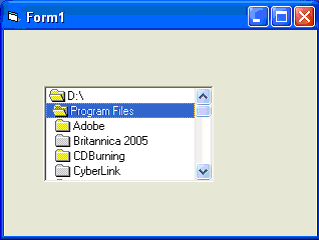
The Directory List Box is used to display the list of folders or directories in a selected drive. You will be able to select different directories from a selected drive in your computer as shown in Figure below,when you place this control into the form and run the program,
|

|
|
12.The File List Box
|
|
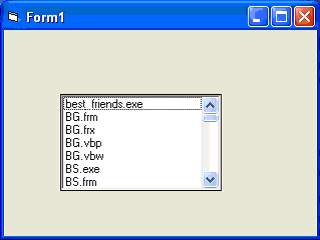
The File List Box is used to display the list of files in a selected directory or folder and when you place this control into the form and run the program, you will be able to a list of files in a selected directory as shown in Figurebelow
|

|
Schl�sselw�rter: Arbeitend mit Kontrollen, Asp arbeiten arbeiten Nettokontrollen, vb Nettokontrollen, grundlegende sichtlichkontrollen, Sichtstudiokontrollen, grundlegende Nettosichtlichkontrollen, Fenster bilden Kontrollen, w�hrend Fenster mit der Steuerverkleidung Akte arbeiteten und mit dem Sichtstudio und mit Steuerung, die c# Kontrollen und arbeiten mit datagrid, Verst�rker- Kontrollen
|
|
| HTML Quizes |
|
|
| XML Quizes |
|
|
| Browser Scripting Quizes |
|
|
| Server Scripting Quizes |
|
|
| .NET (dotnet) Quizes |
|
|
| Multimedia Quizes |
|
|
| Web Building Quizes |
|
|
| Java Quizes |
|
|
| Programming Langauges Quizes |
|
|
| Soft Skills Quizes |
|
|
| Database Quizes |
|
|
| Operating System Quizes |
|
|
| Software Testing Quizes |
|
|
| SAP Module Quizes |
|
|
| Networking Programming Quizes |
|
|
| Microsoft Office Quizes |
|
|
| Accounting Quizes |
|
|
|
