Working with Java Controls
WebLogic Workshop provides Java controls that make it easy for you to
encapsulate business logic and to access enterprise resources such as
databases, legacy applications, and web services. There are three
different types of Java Controls: built-in Java controls, portal
controls, and custom Java controls.
A D V E R T I S E M E N T
Built-in controls provide easy
access to enterprise resources. For example, the Database control makes
it easy to connect to a database and perform operations on the data
using simple SQL statements, whereas the EJB control enables you to
easily access an EJB. Built-in controls provide simple properties and
methods for customizing their behavior, and in many cases you can add
methods and callbacks to further customize the control.
A portal control is a kind of built-in Java control specific to the
portal environment. If you are building a portal, you can use portal
controls to expose tracking and personalization functions in multi-page
portlets.
You can also build your own custom Java control from scratch. Custom
Java controls are especially powerful when used to encapsulate business
logic in reusable components. It can act as the nerve center of a piece
of functionality, implementing the desired overall behavior and
delegating subtasks to built-in Java controls (and/or other custom Java
controls). This use of a custom Java control ensures modularity and
encapsulation. Web services, JSP pages, or other custom Java controls
can simply use the custom Java control to obtain the desired
functionality, and changes that may become necessary can be implemented
in one software component instead of many.
If you are connecting to an enterprise resource that exposes a
standards-based, J2EE, or Web Services interface, you can create a
custom Java control to directly connect to that application. However, if
you are connecting to an external resource that is proprietary or does
not expose standard J2EE APIs, you may need to use a JCA (Java Connector
Architecture) adaptor and an Application View control rather than a Java
control to connect to that resource. JCA adaptors and the Application
View control are available through WebLogic Integration.
Getting Started with Java Controls
When you're building WebLogic platform applications, Java controls provide a
convenient way to incorporate access to resources and encapsulate business
logic. If you've used WebLogic Workshop, you may be familiar with built-in
Java controls such as the
Database
control, EJB
control,
Web Service
control, and so on. These are included with the IDE, but you can also
create your own custom Java control. You can use controls from within the
many kinds of components that make up WebLogic platform applications. A good
practice is to use the custom Java control to implement your business logic
and call built-in controls when the implementation of the business logic
requires this. This topic provides an overview of Java controls in
platform applications. It includes the following sections:
What Are Java Controls?
Java controls are reusable components you can use anywhere within a
platform application. You can use built-in controls provided with WebLogic
Workshop, or you can create your own.
Note: In previous versions, controls
were represented as CTRL files. While applications built with these controls
are still supported, they are deprecated for future versions. You should
build new applications with Java controls based on the new model.
Uses for Java controls. The framework that supports Java
controls is flexible, supporting a wide variety of uses for controls. Java
controls can:
-
Contain business logic you want to keep separate from other application
code, or which may be reused.
-
Provide access to resources such as databases or other resources.
-
Collect logic that coordinates multiple actions, such as those that
involve multiple database queries, calls to Enterprise JavaBeans (with
the EJB control), and so on. A control participates in the implicit
transaction of a conversational container, such as a web service that is
conversational.
Built-in and custom Java controls. WebLogic Workshop
provides several built-in controls, and you can build your own.
-
WebLogic Workshop provides several built-in controls, mostly
designed to provide access to resources. For example, you can use the
EJB control for access to Enterprise JavaBeans, the JMS control for
access to the Java Message Service, and so on. For more information
about the built-in controls, see
Using
Built-In Java Controls.
- You can build your own controls that are based on the same framework on
which built-in controls are based. You design a custom control from the
ground up, designing its interface and business logic, adding other controls
as needed. You can design a custom control for use in one project, or you
can design a custom control for easy reuse in multiple projects. For more
information about the custom controls, see
Building
Custom Java Controls. The tutorial,
Tutorial: Java Control, provides a hands-on introduction to building
custom controls. Much of this topic also includes information on building
your own controls.
Java Controls in the IDE
Built-in Java controls, and custom Java controls that have been set up for
use in multiple projects, are listed in the WebLogic Workshop Data Palette. By
default, the Data Palette is displayed in the lower-right corner of the IDE. You
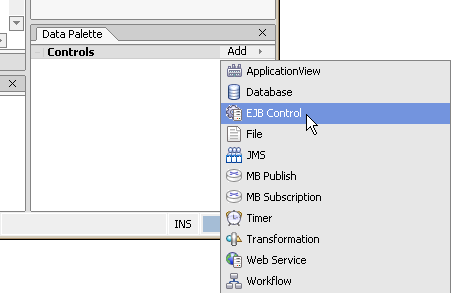
can add new controls to a design by clicking the Data Palette's Add menu, as
shown here:
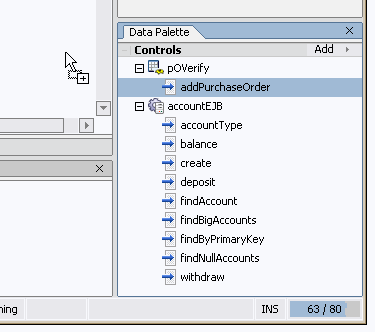
When a control is in your design, its methods and callbacks are also listed
in the palette. You can also drag methods and callbacks onto your design to
create "pass-through" methods. A pass-through is a shortcut way to call a
control's method from your current design.
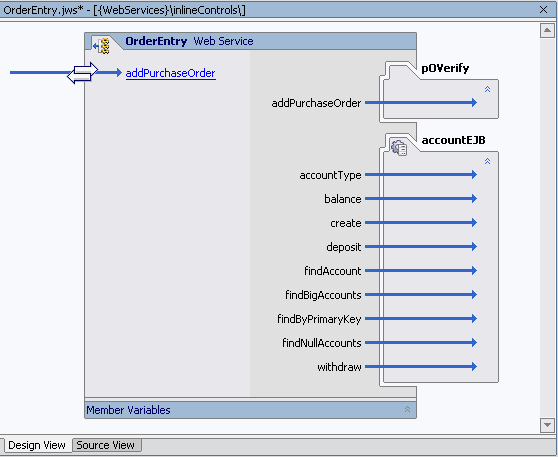
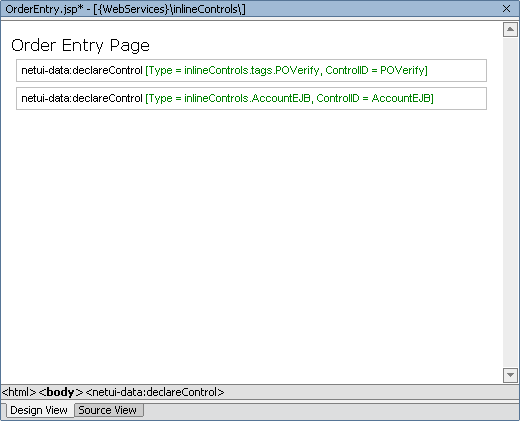
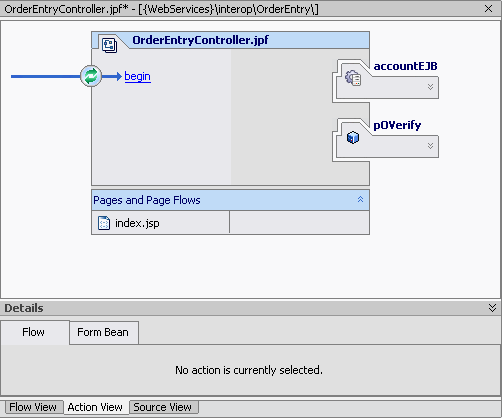
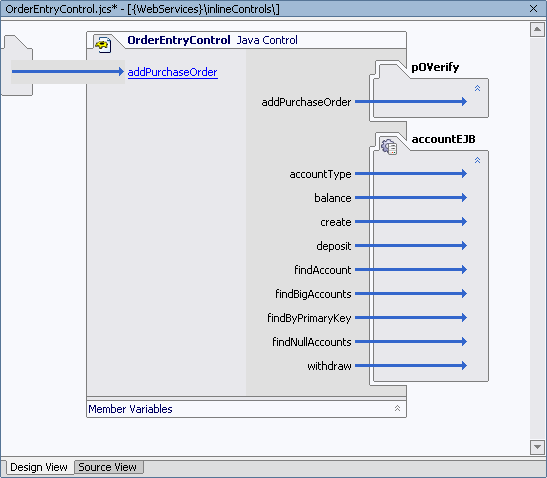
Java controls appear in Design View, but will look slightly different
depending on the file type you are designing with. The following illustrations
show a custom (POVerify) and built-in (EJB control) Java control in various
types of component source files.
Controls in a web service (JWS) design:
Controls in a JavaServer Pages (JSP) design:
Controls in a Java page flow (JPF) action view:
Controls in a Java control (JCS) design:
Building Custom Java Controls
You can build your own Java controls. Java controls you build are like those
provided with WebLogic Workshop in that they provide a way to encapsulate
business logic or access a resource, and yet expose a simple interface. However,
unlike controls that are built into WebLogic Workshop, where you have access to
an interface that extends the source, you can use your own control source files
nested within the project that accesses the control. This makes Java controls
particularly useful as containers for code that should reside in the same
project but which is best kept separate.
Ways to Think About Custom Controls
Local controls and control projects. You can use controls
locally as source, or group them into control projects.
-
A control is said to be local when its source files reside
in the same project as the code that uses the control. This is the
simplest way to use Java controls. You can create a JCS file, add
methods and callbacks to it, then call the methods from code in the
same project. This is most likely the way you will use Java controls
you create. For step-by-step instructions on creating and using
local Java controls, see
How Do I: Create and Use a Custom Java Control Within an Existing
Project? You might also be interested in
Tutorial: Java Control. For examples of local controls, see the
SamplesApp application installed with WebLogic Workshop; there, look
in the WebServices project, in its localControls subfolder.
- Control projects provide a way to group related controls,
and to package them for distribution among multiple projects. You create
a control project just as you would other kinds of projects, then add
files for your controls. The result of a control project is a JAR file
you can distribute for use in any WebLogic Workshop application. By
default, building a control project will automatically copy the
resulting JAR to the Libraries folder of the application containing the
project.
Tutorial: Java Control includes information about packaging controls
into a control project. The ControlProject project in the SamplesApp
application installed with WebLogic Workshop is an example of a control
project. For step-by-step instructions on beginning a control project,
see
How Do I: Create and Use a Java Control Within a Control Project?
Regular and customizable controls. Some controls provide
a static interface, some are customizable.
-
Most of the custom controls you build will probably be regular
controls. They don't provide a customizable interface. That is, their
interface is already defined when an application developer adds them to
an application. In this way, a regular control is like a library of
reusable code. The built-in Timer control is an example of a regular
control, as are the controls whose source code is included in the
SamplesApp application installed with WebLogic Workshop.
-
Most of the built-in controls provided with WebLogic Workshop are
customizable controls. That is, when you add a new one to a
project, WebLogic Workshop generates a JCX file that extends the
control. In some cases, such as with the Database control or JMS
control, you can customize the control by adding or editing methods
defined in the JCX file. Others are customized for you, as with the EJB
control, which is customized based on the EJB the control will be
accessing. Building customizable custom controls is an advanced subject
beyond the scope of this documentation. For an example of a customizable
custom control, see the JcxCreate sample in the ControlDevKit sample
application available with WebLogic Workshop.
Working with Java Control Sources
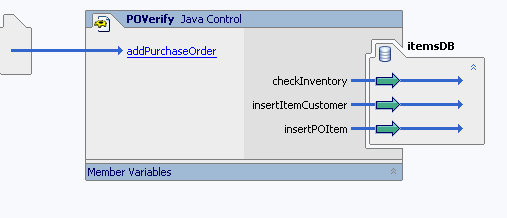
Design view for custom controls. You begin building a Java
control much as you would start building other WebLogic Workshop components.
After you create a Java control source (JCS) file, Design View provides a
space in which you can create a visual representation of your control's
interface as well as the controls it may itself be using. The Java control
design space is very much like the web service design space. The left side
displays operations that will be visible to the control's clients, while the
right side displays nested controls.
Note: You have easy access to a
control's source file when the source is in the same project as the design
you're editing. When you are building a web service, page flow, or Java
control that includes a control whose source is in the same project, you can
double-click the control at the right side of the design to open its JCS.
When you add a new Java control source file to a project, WebLogic
Workshop also adds a JAVA file that contains the control's public interface.
By default, as you work in the JCS file, adding methods, callbacks, and
implementation code, WebLogic Workshop keeps the interface in sync. For
example, adding an operation to the JCS will also add a corresponding method
to the JAVA file. Note that the JAVA file will be kept in sync only with
respect to those methods with an @common:operation annotation. This means
that if you add a method to the JCS, then remove it's @common:operation
annotation, WebLogic Workshop will remove the method from the JAVA file.
For step-by-step information on beginning a Custom Java control, see
How Do
I: Begin a New Custom Java Control. You might also be interested in
How
Do I: Create and Use a Custom Java Control Within an Existing Project?
Properties for Java controls. Controls you create can
expose properties. For example, the Database control provides properties
that specify its database connection, log category name, and so on.
You define properties by creating an annotation XML file that describes
them. You then associate the file with the control source code through the
JCS file's control-tags property. When a developer is using the control,
setting its properties, the settings are saved as annotations in the
developer's code.
For step-by-step information on defining control properties, see
How Do I: Define Properties for a Java Control?
IDE characteristics for a control. You can define
certain IDE characteristics for your Java control. These include the icon
that represents it in palettes and menus (and whether it is displayed in the
palette at all), its description in the Property Editor, and so on. You'll
find settings for these characteristics in the JCS file's jc-jar property.
For more information, see
How Do I: Specify IDE Characteristics for a Java Control?
Testing Java controls. While you can't "run" a JCS file
in Test View, as you can with the similar JWS file, WebLogic Workshop does
provide a shortcut for easy testing. You can generate a JWS file through
which you can exercise the control's code as you're writing it. For more
information, see
How Do I: Generate a JWS File to Test a Java Control?
Keep in mind that testing isn't complete until you've tried out the
control in all the scenarios you expect it to support. Whether the control's
container is likely to be a JWS file, a JSP file, or a JPF file, it's a good
idea to build a test application that uses your control for the purpose for
which you've designed it.
Invoking a Control Method
Once you've added a Java control to your application, you can invoke the
methods of the Java control from Source view using the standard Java dot
notation. For example, assume that you have added the CustomerDb Java
control and declared a variable for the control as
custDb, and that the control defines a method as follows:
String [] getAllCustomerNames()
You can invoke this method from your code as follows:
String [] custNames;
custNames = custDb.getAllCustomerNames();
Overriding Control Property Settings
Note that when you declare a control (a JCS or JCX file) within a client
you can override the control's default properties.
Suppose you have a database control with the
connection property defined so that the
data-source-jndi-name attribute points at the data source
dataSource.
DatabaseControl.jcx
    /**
     * @jc:connection data-source-jndi-name="dataSource"
     */
    public interface DBControl extends com.bea.control.ControlExtension, DatabaseControl
The database control is declared with its default properties in the
following way.
MyWebService.jws
	/**
  	 * @common:control
	 */
	private DatabaseControl dbControl;
To override the default connection
property on the database control, use the following declaration.
	/**
  	 * @common:control
	 * @jc:connection data-source-jndi-name="myOtherDataSource"
	 */
	private DatabaseControl dbControl;
In the above declaration, the database control will use
myOtherDataSource instead of its default
dataSource. This override value will apply
to all method calls from within MyWebService.jws.
There are two important caveats when overriding control properties in
this way.
(1) The property must be at the class level, not the method level. Only
those properties that are scoped to the entire control class may be
overriden in this way.
(2) The override occurs at the property level, not at the attribute
level. It not possible to override only a single attribute on a property.
You must override all of the property's attribute values. For example,
suppose that the connection property had
three attributes instead of just one.
DatabaseControl.jcx
    /**
     * @jc:connection data-source-jndi-name="dataSource" attribute2="value2" attribute3="value3"
     */
    public interface DBControl extends com.bea.control.ControlExtension, DatabaseControl
In this case, when you override the connection
property, you override all of that property's attributes, not merely the
data-source-jndi-name attribute. In short,
the following override sets the data-source-jndi-name
attribute to myOtherDataSource and
attribute2 and
attribute3 to null.
MyWebService.jws
	/**
  	 * @common:control
	 * @jc:connection data-source-jndi-name="myOtherDataSource"
	 */
	private DatabaseControl dbControl;
For this reason, you should specify all of the attributes when you
override a control property.
	/**
  	 * @common:control
	 * @jc:connection data-source-jndi-name="myOtherDataSource" attribute2="otherVal2"
	 attribute3="otherVal3"
	 */
	private DatabaseControl dbControl;
Handling Control Method Exceptions
The designer of a Java control may choose whether or not to explicitly
declare that exceptions are thrown by the control's methods. If a control
method is declared to throw exceptions, you must enclose your invocations of
that method in a try-catch block. Even if the designer of the control
chooses not to declare exceptions, the support code that implements the
control can still throw exceptions. The type of exception thrown is
com.bea.control.ControlException.
You should strongly consider handling all control exceptions that may be
thrown by the controls you use in a web service. If you do not handle the
exception, the web service method will fail and the exception will be passed
on to the client of your web service. In most cases, the exception is
useless to the client and the client does not have the necessary information
to diagnose or remedy the problem.
Control Factories: Managing Collections of Controls
This topic describes control factories, which are collections of
built-in or custom Java control instances. What Is a Control Factory?
A control factory allows a single application to manage multiple
instances of the same control.
For example, imagine a credit approval application that accepts batches
of approval requests (one per applicant) and uses an external web service,
via a Web Service control, to evaluate the requests. The application could
use a control factory to create multiple instances of the Service control
and dispatch requests to the Service control instances in parallel. If the
control uses callbacks, a single parameterized callback handler in the
calling application handles the callbacks received from all of the control
instances.
You can only use control factories within a Java Web Service (JWS) or
Java Process Definition (JPD) file. For more information on building Java
Web Services with WebLogic Workshop, see
Building
Web Services. For more information on using JPD files, see
Guide to Building Business Processes.
Automatically Generated Factory Classes
For any control interface called MyControl, WebLogic Server generates a
control factory interface called MyControlFactory that has the following
very simple shape:
interface MyControlFactory
{
     MyControl create();
}
The implicit factory class is located in the same package as the control
class; that is, if the full classname of the control interface is
com.myco.mypackage.MyControl, then the full
classname of the factory is
com.myco.mypackage.MyControlFactory. An automatic factory class is
not generated if there is a name conflict (i.e., if there is already an
explicit user class called MyControlFactory.).
Therefore, if you want WebLogic Workshop to automatically generate factory
classes for a built-in or custom control, make sure that the name of that
control does not end with the word "Factory".
A control factory instance can be included in a file just as a control
instance can, with the same Javadoc annotation preceding the factory
declaration that would precede a single control declaration.
For example, an ordinary Web Service control is declared as follows:
   /**
    * @common:control
    */
   MyServiceControl oneService;
Meanwhile, a Web Service control factory is declared as follows:
   /**
    * @common:control
    */
  MyServiceControlFactory manyServices;
Note again that the set of annotations allowed and required on a factory
are exactly the same as the set of annotations on the corresponding control.
The factory behaves as if those annotations were on every instance created
by the factory.
Once an application includes a control factory declaration, a new
instance of a single control can be created as follows:
   // creates one control
   MyServiceControl c = manyServices.create();


   // then you can just use the control, store it, or whatever.
   c.someMethod();


   // For example, let's associate a name with the service...
   serviceMap.put("First Service", c);
Factory classes are automatically generated on-demand, as follows. When
resolving a class named FooFactory:
-
First the class is resolved normally. For example, if there is a CLASS
file or JAVA file or JCX file that contains a definition for
FooFactory, then the explicitly defined
class is used.
-
If there is no explicit class FooFactory,
then, since the classname ends in "Factory", we remove the suffix and
look for an explicit class called Foo
(in the same package).
-
If Foo is found but does not implement
the Control interface (i.e., is not annotated with
@common:control), it's considered an
error (as if Foo were never found).
-
However, if Foo is found and implements
the Control interface, then the interface
FooFactory is automatically created; the interface contains only
the single create() method that returns the Foo
class.
All instances of the control are destroyed when the application instance
that created them is destroyed. Parameterized Callback Handlers
Since there may be multiple controls that were created with a single
control factory, and they all have the same instance name, a mechanism is
provided to enable you to tell which instance of the control is sending a
callback.
For example, for the oneService example
above, an event handler still has the following form:
    void oneService_onSomeCallback(String arg)
    {
        System.out.println("arg is " + arg);
    }
For callback handlers that are receiving callbacks from factory-created
control instances, the callback handler must take an extra first parameter
that is in addition to the ordinary parameters of the callback. The first
parameter is typed as the control interface, and the control instance is
passed to the event handler.
The manyServices factory callback handler looks like this:
   void manyServices_onSomeCallback(MyServiceControl c, String arg)
   {
       // let's retrieve the remembered name associated with the control
       String serviceName = (String)serviceMap.get(c);


       // and print it out
       System.out.println("Event received from " + serviceName);
   }
|
